
Material Management System Usage Tutorial

Material Management System
Chengdu Bopood Technology Co., Ltd.
December 2025
Contents
1. Software Installation
The Material Management System is installed together with the [Plugin Manager]. Run the [Plugin Manager] installer and follow the prompts to install it under the PDMS installation path.
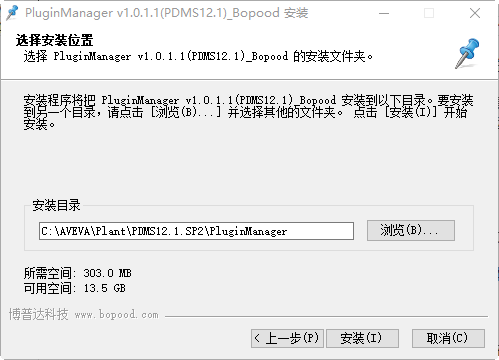
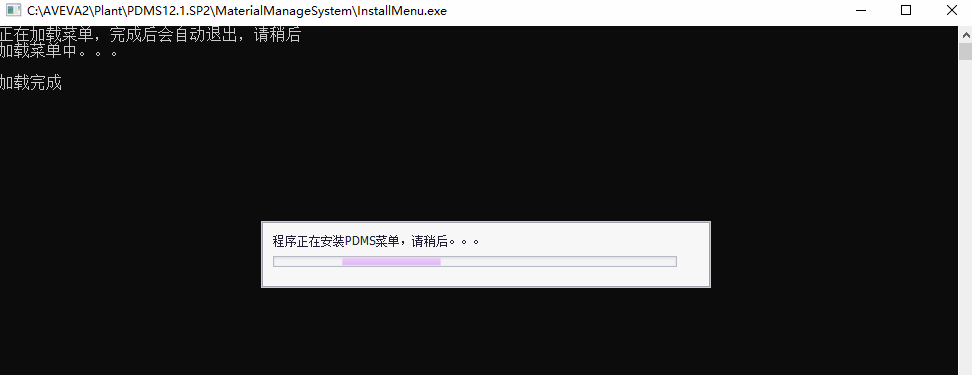
**Note: As shown in the figure, the installation directory must end with the PluginManager folder; do not install it directly under the PDMS root directory.**After installation, a command window opens and the program loads the menus. When loading is complete, the program exits automatically; do not close it manually during the process.
Start the Plugin Manager
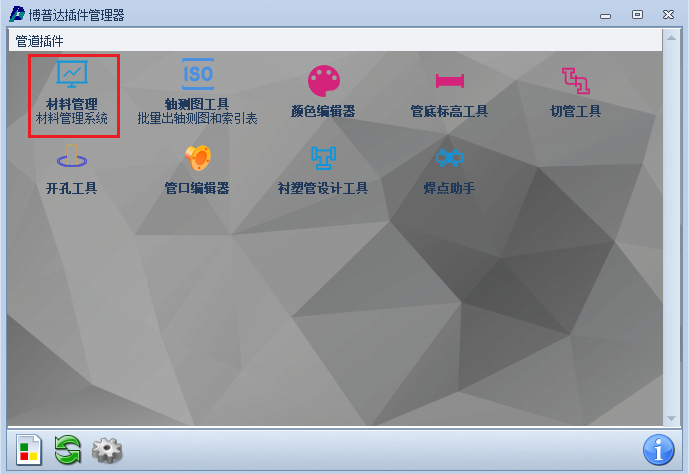
Click the [Bopood Plugin Manager] toolbar on the PDMS menu bar to start the software.

Loading the Material Management System License
Click the [Material Management System] icon to open the main interface.
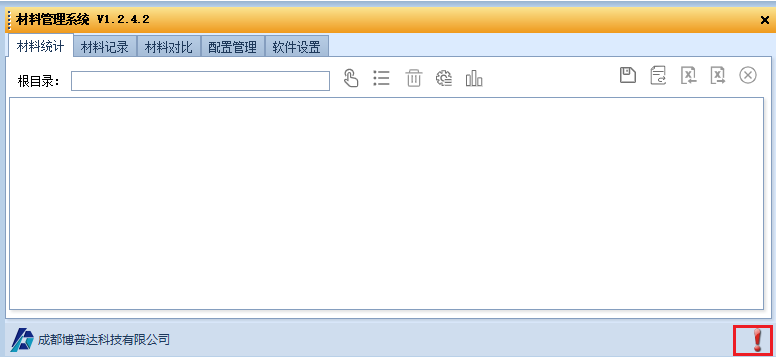
Click the red exclamation mark in the lower-right corner of the [Material Management System] interface.
Floating License
A floating license requires one computer to act as the server (with a stable network connection). Computers on the same LAN connect to the server to obtain a license.
① Install the License Manager
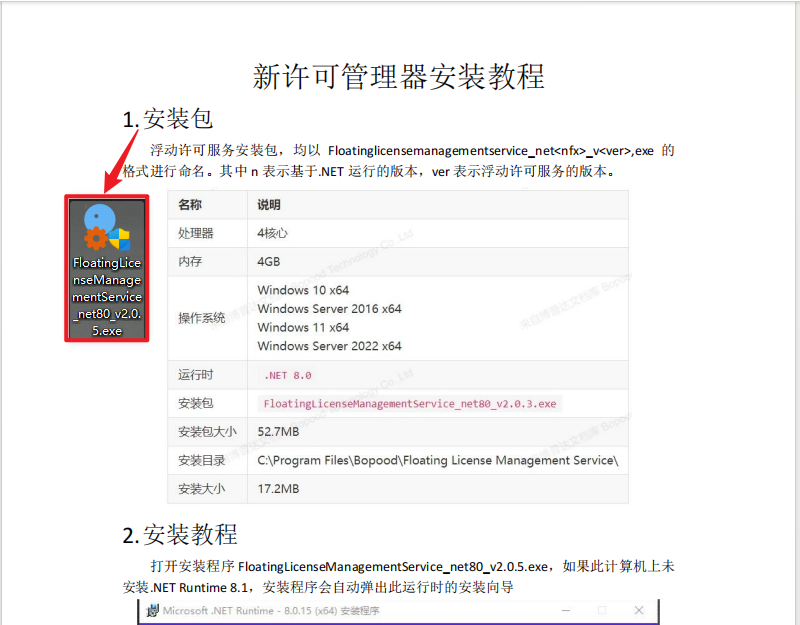
FloatingLicenseManagementService must be installed on the server computer first. See the 'New License Manager Installation Guide' for instructions.
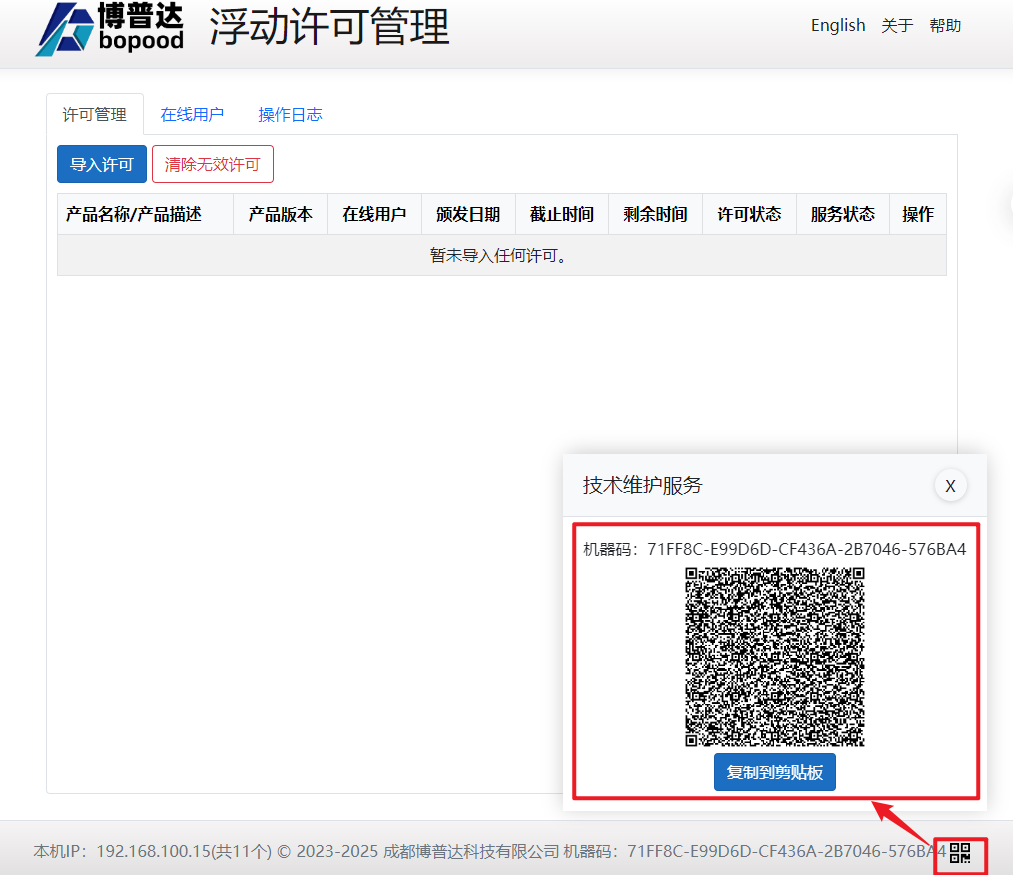
② Obtain the Machine Code and IP Information
After installation, double-click the icon to open the License Management interface, scan the QR code, and send the scanned content to technical support to obtain a license.
- Read License
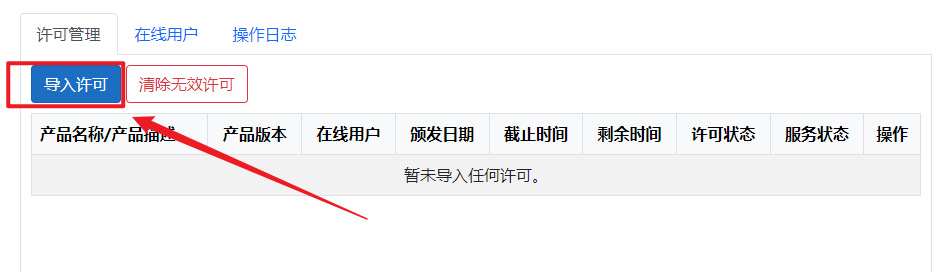
Server:
Import one license file with the .server.flic extension and enable the service.
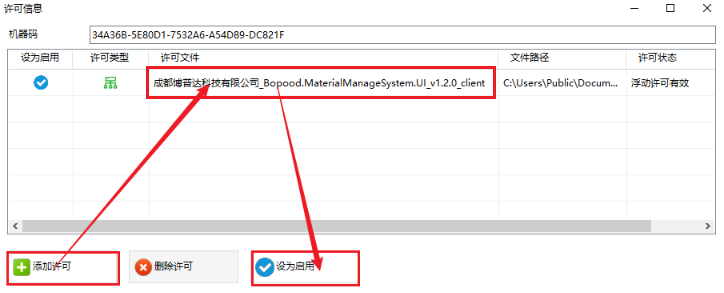
Client:
Add the Material Management System floating license and set it to Enabled.
Standalone License
- Obtain Machine Code
Copy the machine code and send it to Bopood technical support to obtain a license. (Skip this step if you already have a license.)
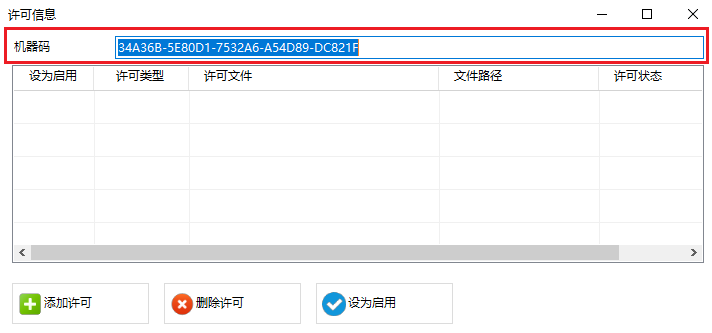
- Read License
Add the Material Management System standalone license and set it to Enabled. The operation is the same as reading a license on the floating license client; the license just needs to be valid.
3. Material Statistics
Select Root Directory
1.1 Add by Selection

Click [Add Root Directory] and select an element in the PDMS tree as the root directory for material summarization. After adding one element, you can keep clicking other elements to append them to the root directory. The same element can be added only once.
1.2 Import Pipeline List
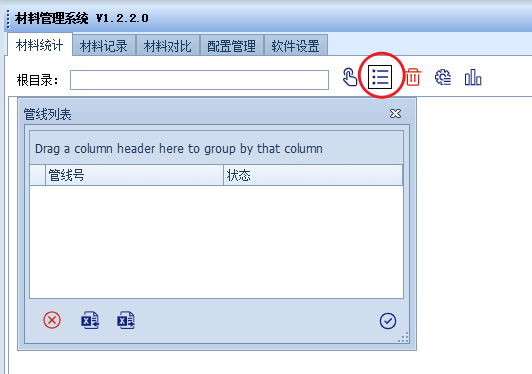
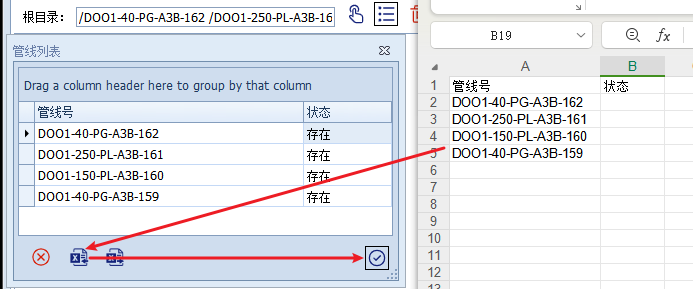
You can also click [Import Pipelines] to open the [Pipeline List] interface, export an empty template, add pipeline numbers to the template, and then import it again. Click [OK] in the lower-right corner to finish adding the directory. Newly imported pipeline numbers will overwrite the selected root directory.
Select Configuration File
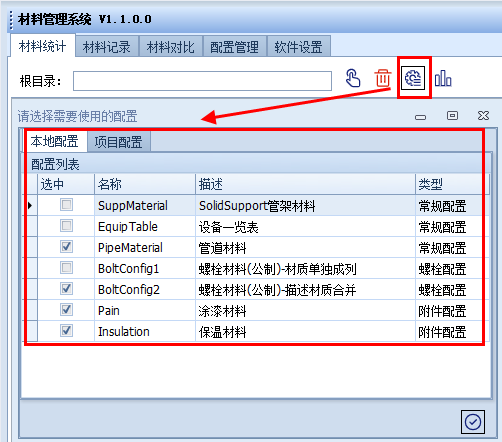
Select the configuration files to use as needed; multiple selections are allowed.
Start Statistics
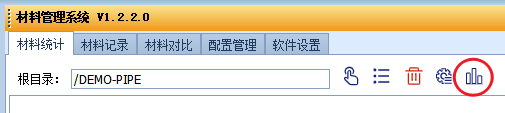
Click the button to start calculating materials configuration by configuration.
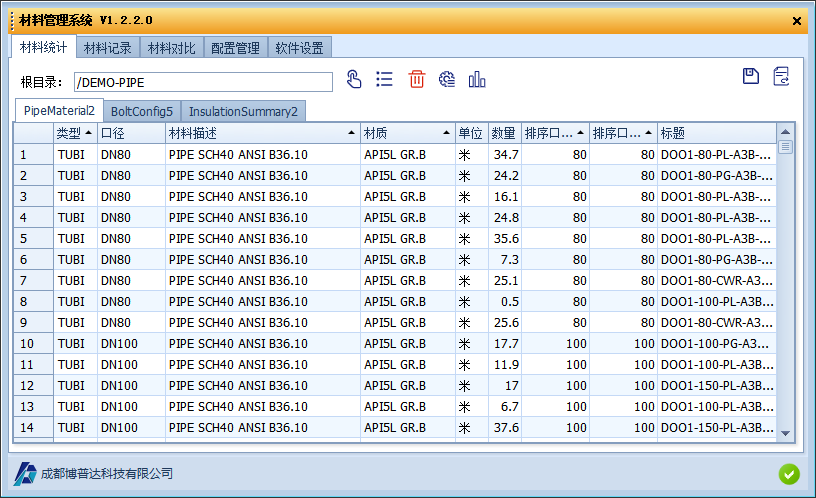
When the calculation is complete, a result tab is added automatically. You can switch tabs to view the results.
Export Report
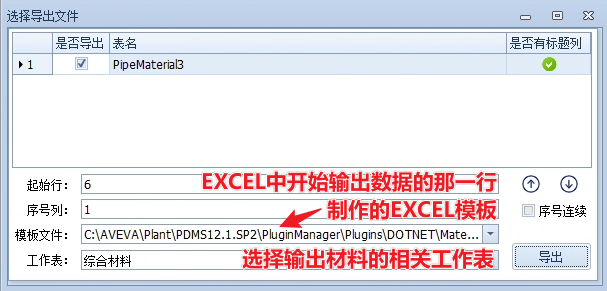
Click [Export Report] to open the export file selection window.
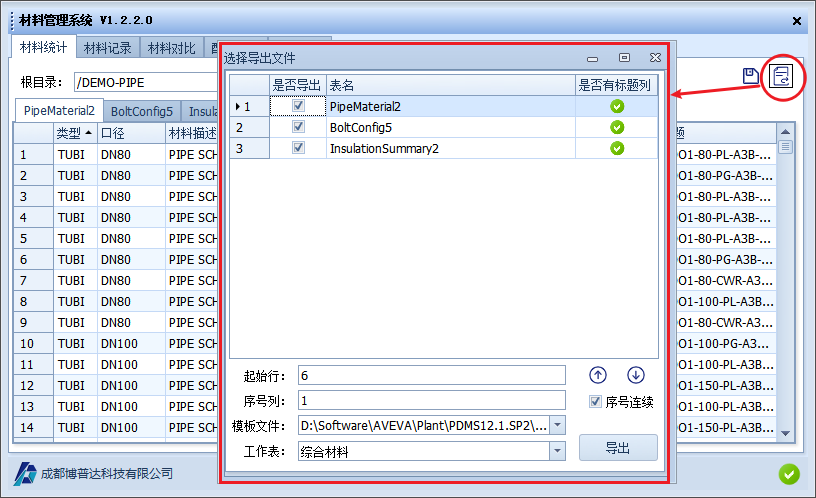
Select the result tabs to export.
Use the up and down arrow buttons to change the export order.
Enter the start row for the exported Excel file. Because the header occupies at least one row, the start row cannot be less than 2.
Click [Export], confirm the output path in the dialog that appears, and generate the report file.
When [Continuous Numbering] is not selected, materials under different titles are numbered from 1. When the exported file contains both configurations with titles and configurations without titles, it is recommended to put the configurations without titles before those with titles for better sorting.
Single-Pipe Material Statistics
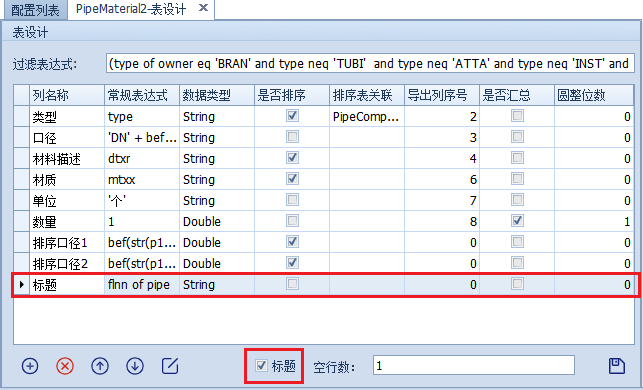
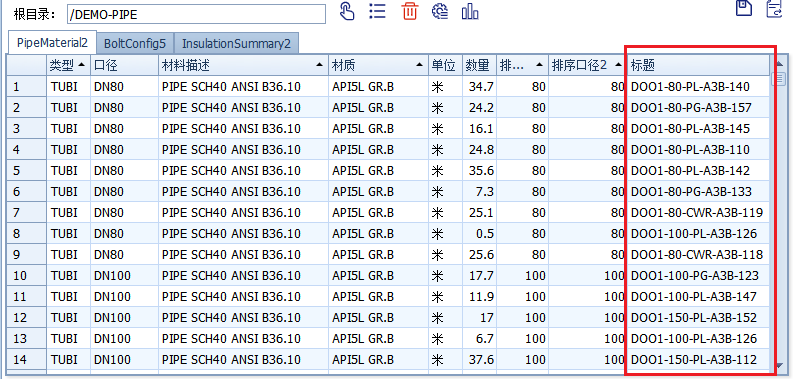
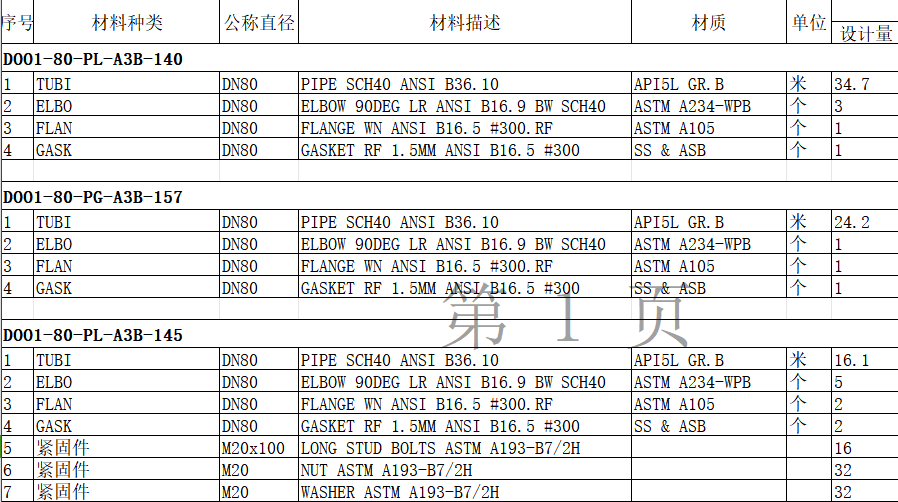
Because the software groups materials with the same title together during export, you only need to add a [Title] column to each configuration and set the expression to extract the pipeline number of the material. See the figure below:
Save Record
Click [Save Record] to open the push settings window.
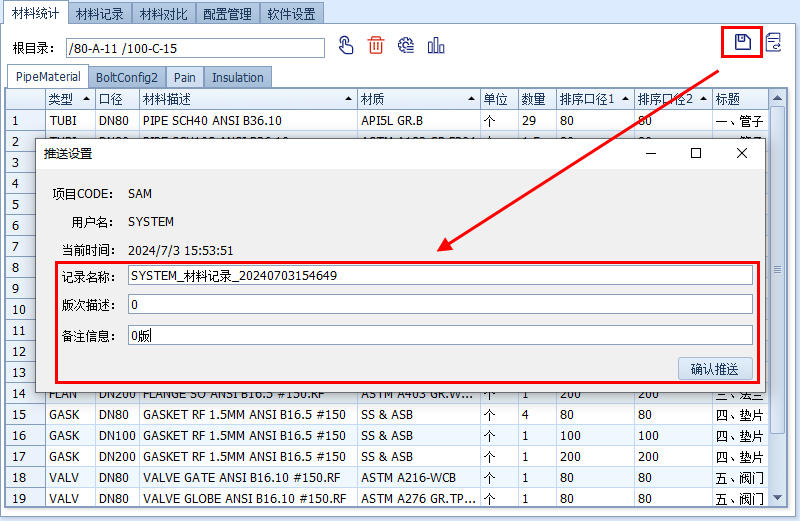
The record name is generated by default and can also be modified.
Give each record a distinct revision description so that records can be compared later.
Add remarks as needed. They can be the same as the revision description or left blank.
After you click [Confirm Push], the calculation results are saved as a record file in the project file (the Sample project is used as an example below) and can be selected in [Material Records] and [Material Comparison].

Trace Elements
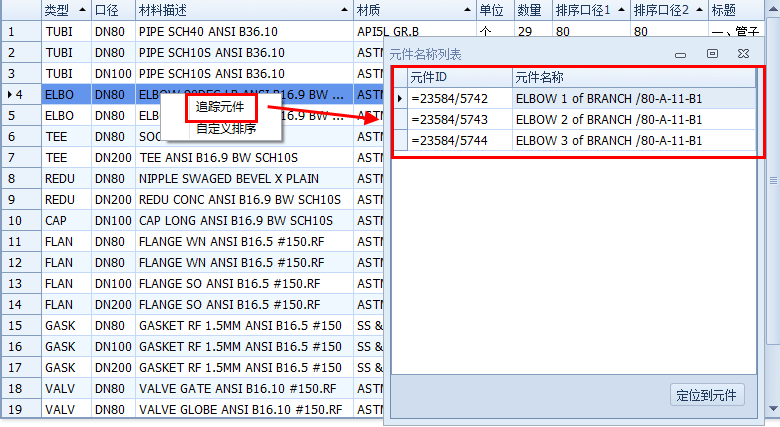
Right-click [Trace Elements] on the statistics result page to view the data composition of that row.
In the element name list, double-click a row or click [Locate Element] to focus the selected element in the PDMS tree.
4. Material Records
1. Select Record
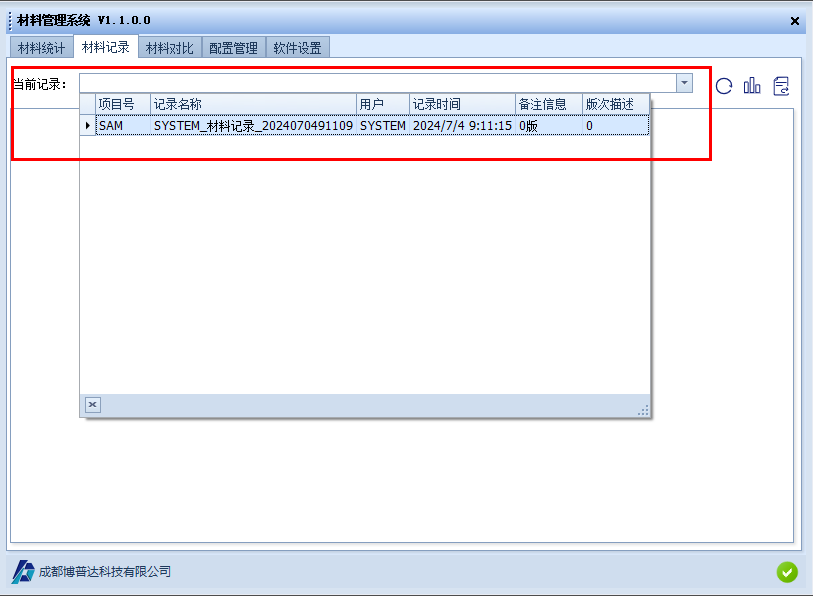
Select a record saved during Material Statistics to restore it as a statistics result table.
2. Refresh Records
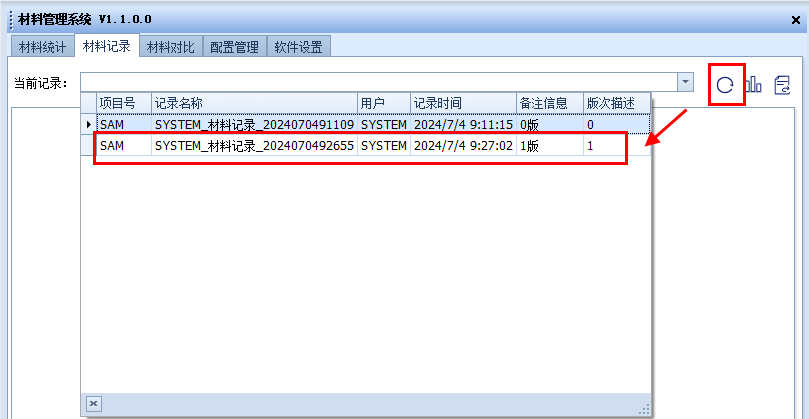
If a record saved during Material Statistics is not available in Material Records, click [Refresh Records] to retrieve it.
3. Generate Report
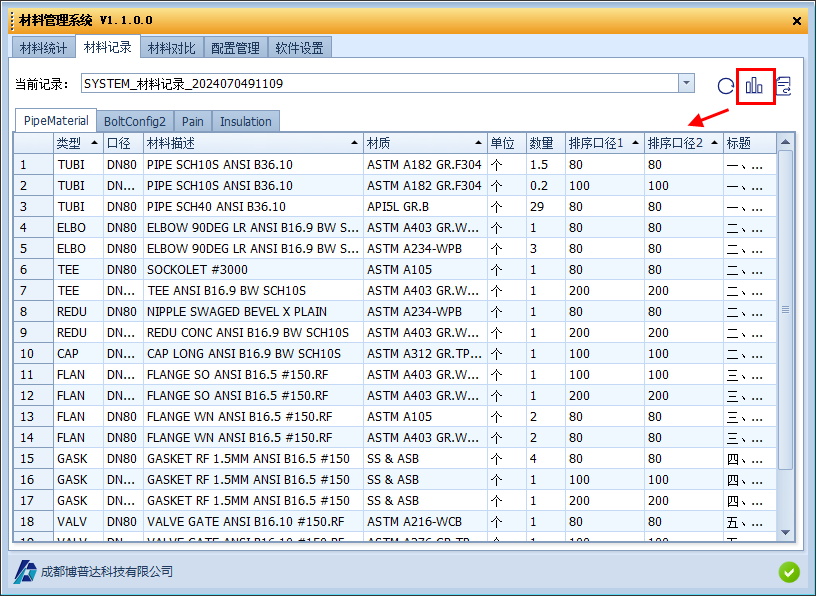
Click [Generate Report] to automatically restore the result table from Material Statistics.
4. Export Report
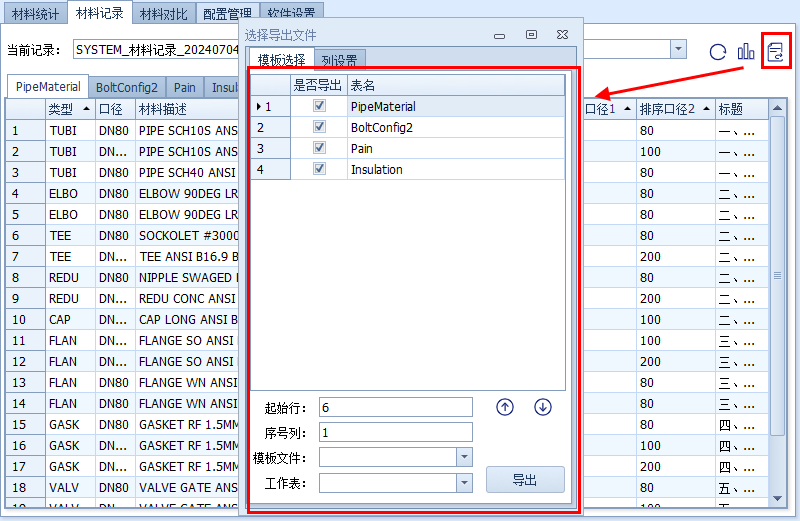
After you click [Export Report], the contents of [Template Selection] are the same as those for exporting a report in Material Statistics.
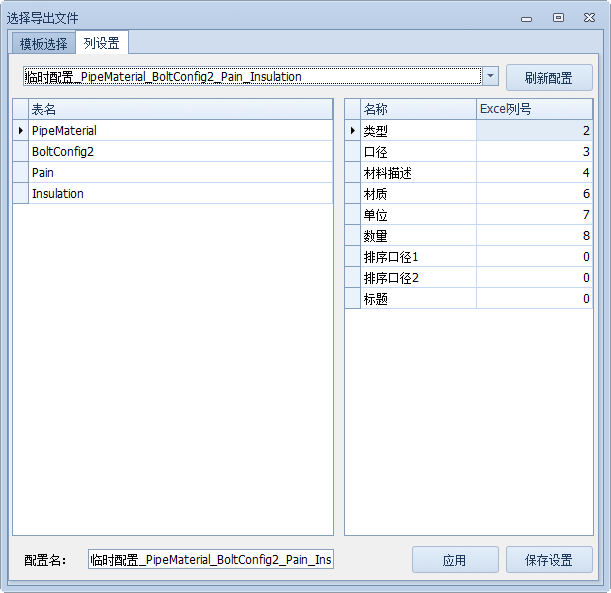
[Column Settings] lets you adjust the Excel output column definitions again. The adjusted settings can be saved permanently or applied only this time. Saved configuration files are stored in the project database path (the Sample project is used as an example below).

5. Trace Elements
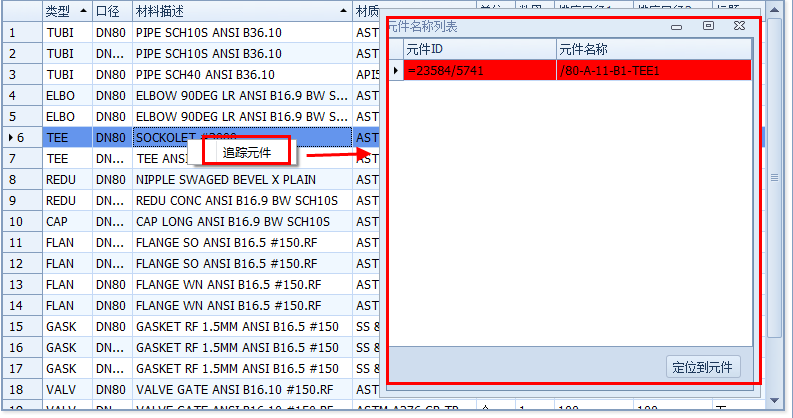
Right-click [Trace Elements] on the statistics result page to view the data composition of that row.
In the element name list, double-click a row or click [Locate Element] to focus the selected element in the PDMS tree.
Elements that no longer exist are shown in red in the table.
5. Material Comparison
1. Select Record
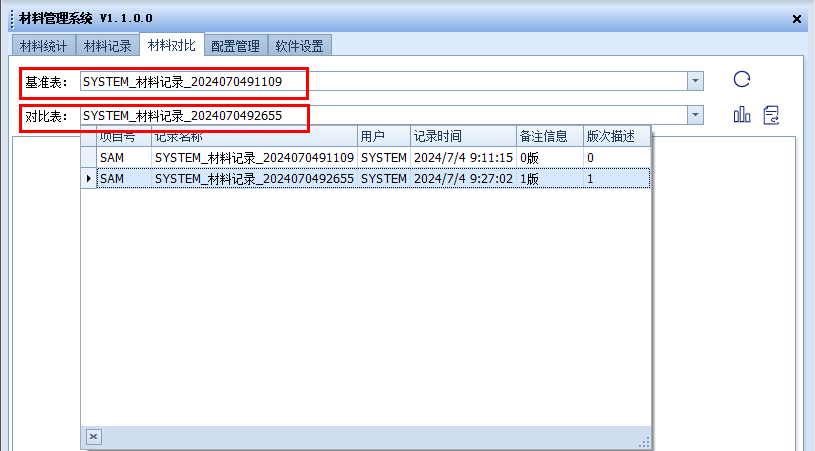
Select the baseline table and the comparison table, and compare the differences with one click.
[Refresh Records] works the same as [Refresh Records] in Material Records.
2. Generate Report
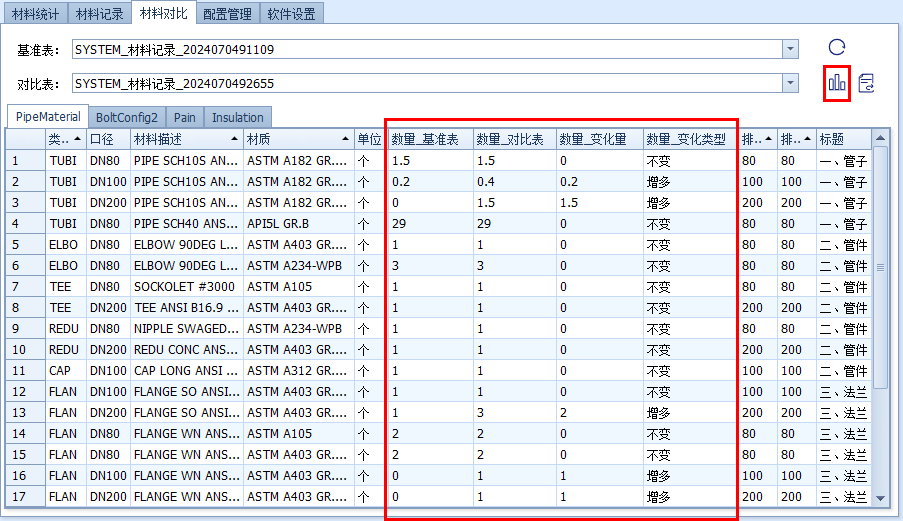
For every column marked for summarization, the comparison result table shows the original quantity, new quantity, quantity difference, and change type.
3. Export Report
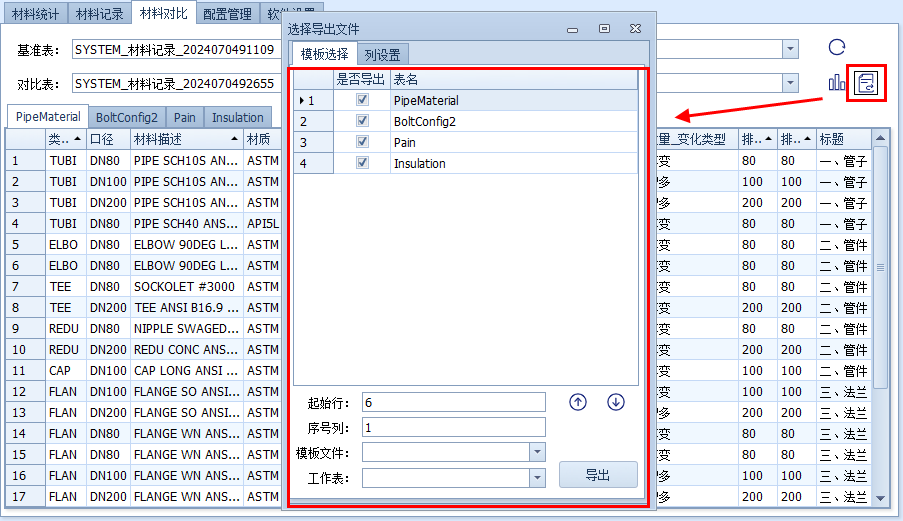
After you click [Export Report], the contents of [Template Selection] are the same as those for exporting a report in Material Statistics.
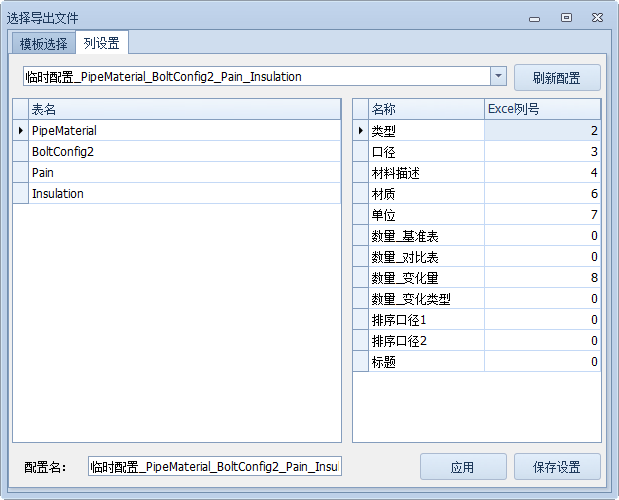
[Column Settings] lets you adjust the Excel output column definitions again. The adjusted settings can be saved permanently or applied only this time.
6. Configuration Management (PDMS Administrator Login)
1. Custom Sort
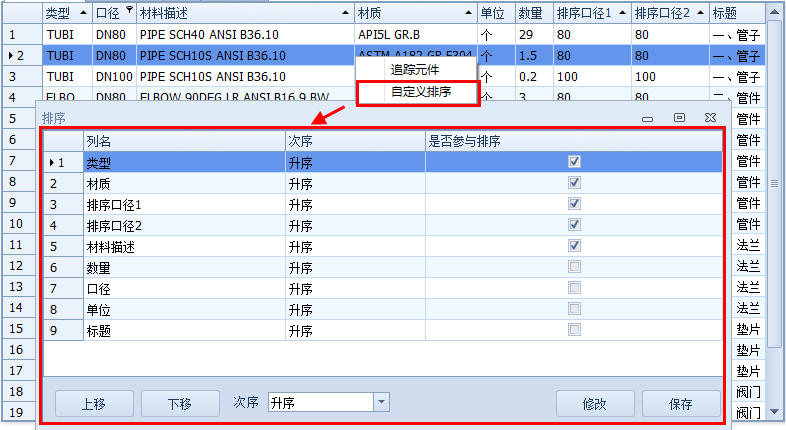
Right-click [Custom Sort] on the result page to edit the column sorting rules of that configuration.
Use the up/down arrows and the order selector to adjust the sorting rules. Click [Save] when finished; the change takes effect on the next calculation.
2. Common Buttons
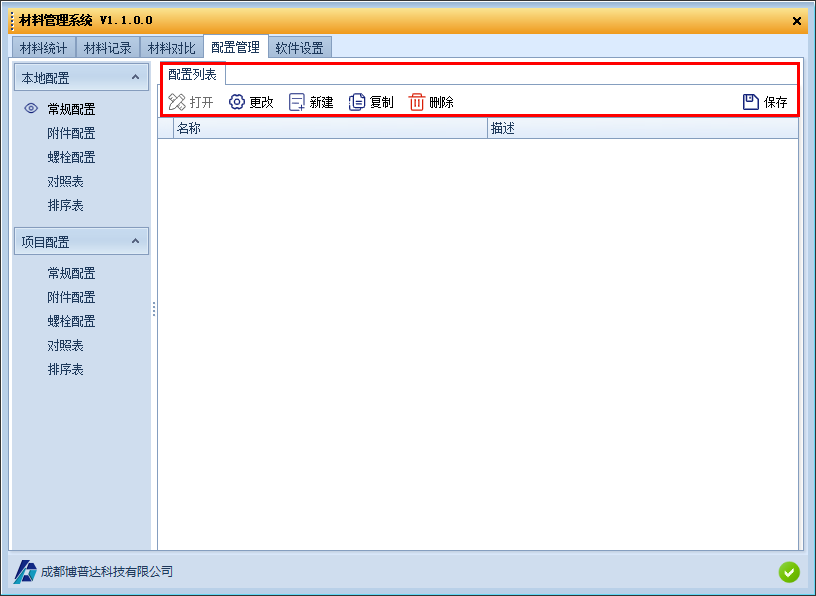
[New]: Create a configuration.
[Copy]: Select a source file and copy it as a new configuration file.
[Delete]: Select the configurations to delete in the list (multiple selections are allowed) and click the button.
[Save]: Save all configuration files to the software installation directory.
[Open]: Open the selected configuration and edit its data.
[Change]: Open the selected configuration and edit its columns.
3. General Configuration
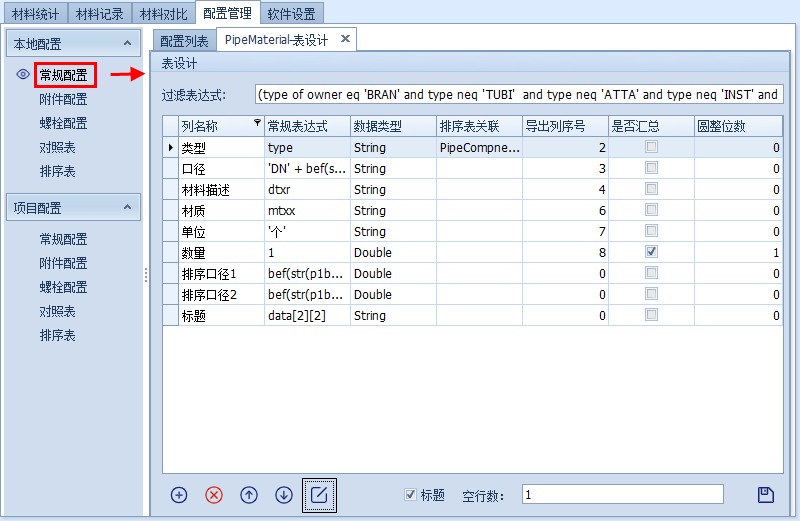
[Add]: Add a row of data.
[Delete]: Delete a row of data.
[Move Up], [Move Down]: Adjust the order.
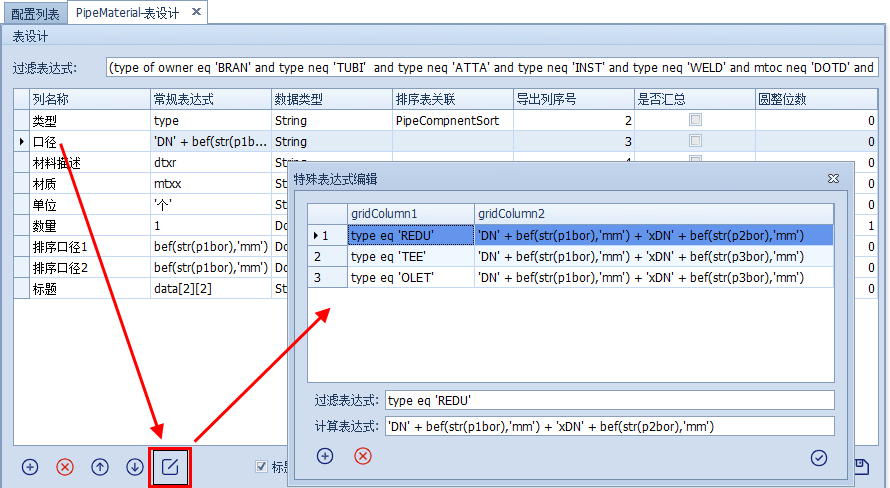
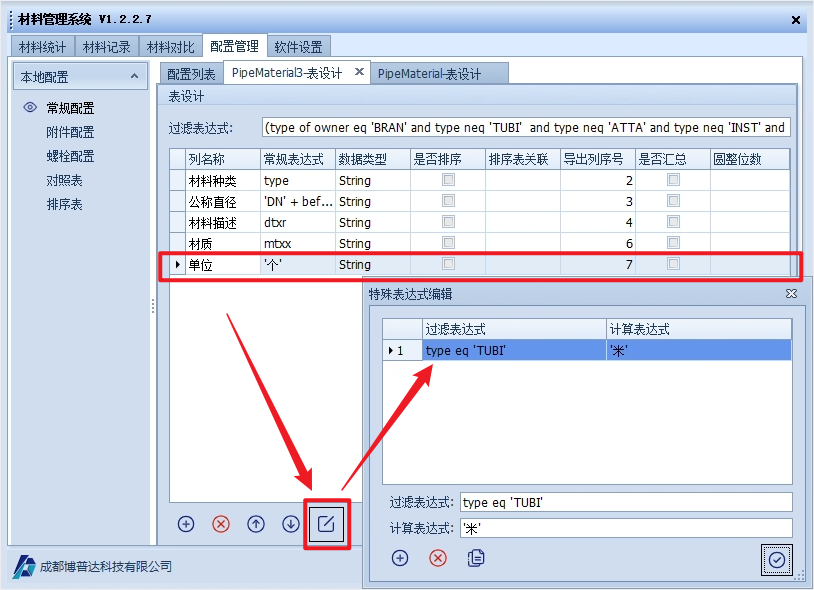
[Special Expression]: For columns with multiple matching rules, such as diameter and unit. Its filter expression works like [Filter Expression] and can perform more complex filtering. Special expressions are matched by type first; if none match, the general expression is used.
[Save]: Save the configuration.
[Filter Expression]: Rules for filtering calculation objects.
[General Expression]: Output rules after the calculation object is found.
[Data Type]: String — the output is a string; Double — the output is a double-precision floating-point number; Bool — the output is a Boolean value.
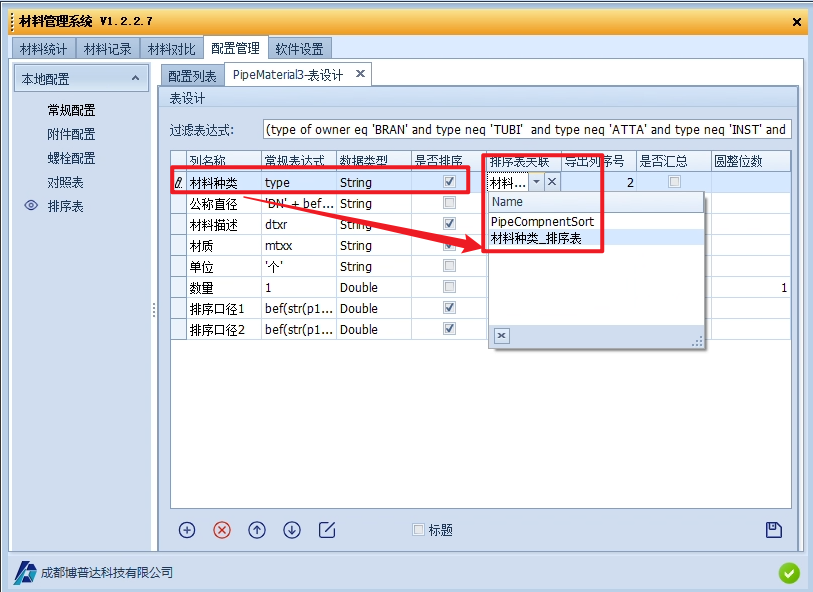
[Sort Table Association]: Associate a sort table with the column. When this column is sorted, the order in the sort table is used, for example TUBI, ELBOW, TEE...
[Export Column No.]: The column number of this column in the exported Excel file; 0 means the column is not exported.
[Summarize]: Select or clear this option to summarize the column. Multiple columns in one table can be summarized separately. Values in summarized columns are added up.
[Decimal Places]: After summarization, round the value to the specified number of decimal places.
4. Attachment Configuration
Attachment configuration applies when the same model has multiple material output rules, such as insulation and painting materials.
For the Change header, see General Configuration. This section mainly explains table editing with Open.
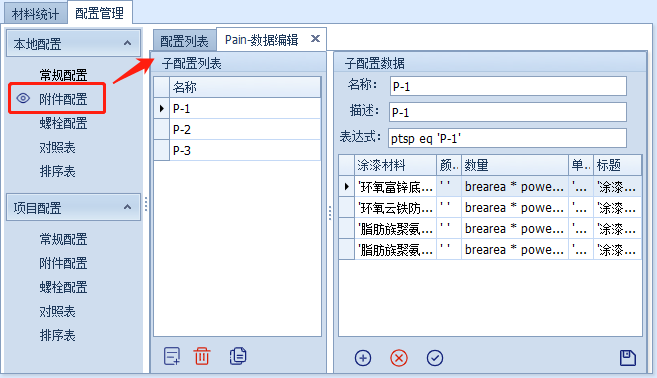
[Add Sub-configuration]: Add a sub-configuration.
[Delete Sub-configuration]: Delete a sub-configuration.
[Copy Sub-configuration]: Copy a sub-configuration.
[Expression]: Matching rule for the sub-configuration, for example to match insulation level or paint code.
[Special Format]: data[1][2] refers to the second column of lookup table 1. Elements that satisfy the sub-configuration conditions are matched in the lookup table, and the matching result is output here.
Note: Plain text must be enclosed in single quotation marks.
Bolt Configuration
The expressions are regular expressions used for character processing of bolt files; users are advised not to modify them.
You can change the output position in Excel by modifying [Export Column No.].
Bolt configuration expressions differ from those of other configurations. They do not use PML but a fixed combination of keywords. The currently supported keywords are [DESCRIPTION] (description), [NS] (size), [LENGTH] (length), [QUANTITY] (quantity), [ITEMCODE] (item code), and [PIPELINENUM] (pipeline number).
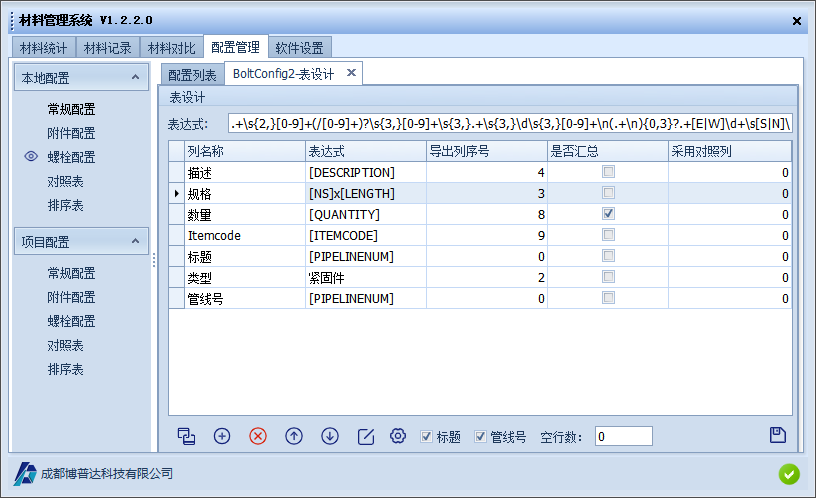
[Add]: Add a row.
[Delete]: Delete the selected row. Columns such as Description, Size, Length, Quantity, and Title cannot be deleted.
[Move Up], [Move Down]: Adjust the row order.
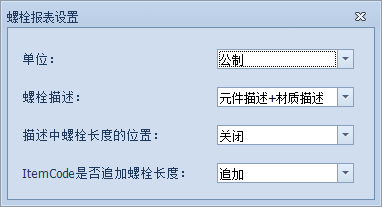
[Bolt Report Settings]: Configure properties of the bolt configuration, similar to the Isodraft module settings.
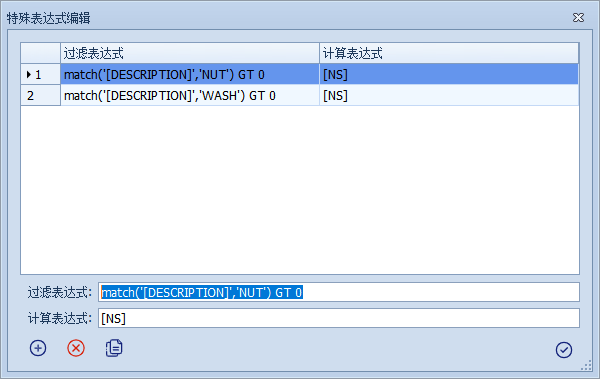
[Special Expression]: Set more detailed filter expressions to extract values under different conditions.
[Title]: Add or remove the title row.
[Blank Rows]: Available after a title row is added. It is the number of blank rows between the title row and the previous material row.
[Pipeline No.]: Add or remove the pipeline number. When [PIPELINENUM] appears in the expression of any column, [Pipeline No.] is selected automatically, and each pipe is counted separately during statistics.
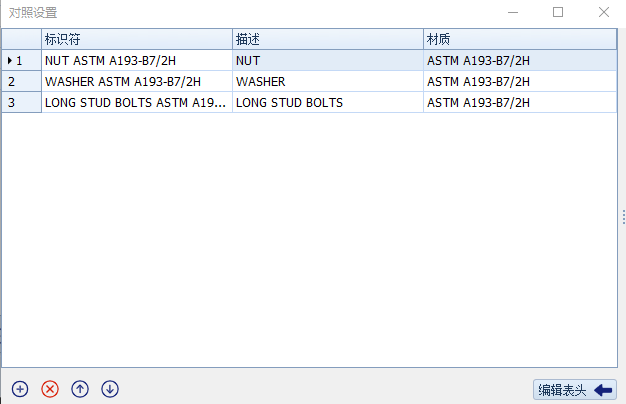
[Lookup Settings]: By defining identifiers, users can customize the extracted data columns and extract specified text from the identifiers, as shown below.
6. Lookup Table
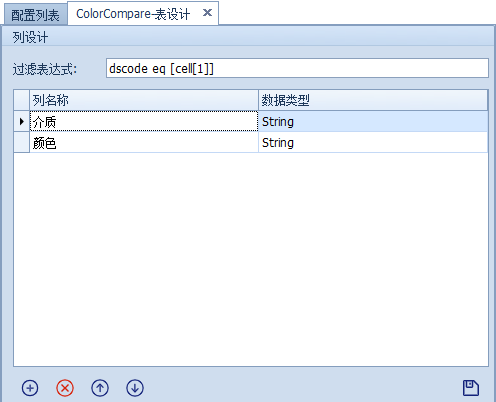
Figure 4-6.1 Table Design
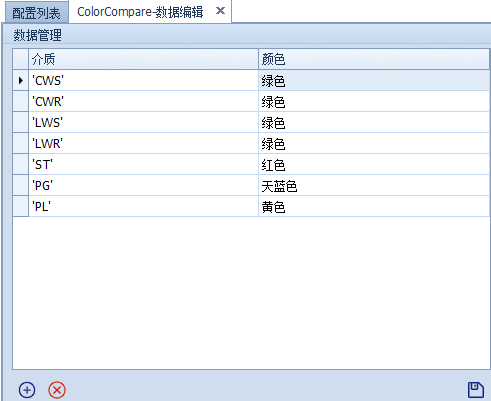
Figure 4-6.2 Data Editing
[Filter Expression]: Specifies the element matching rule. In the figure, the expression matches the dscode attribute of the input element against 'Medium'; the actual data is entered in data editing. [cell[1]] refers to the first row here, 'Fitting Type'. This is a fixed format and cannot be changed; users only need to modify the number inside.
[External Call]: Enter data[a][b] in the external configuration file to extract the matching data from column b of lookup table a.
Sort Table
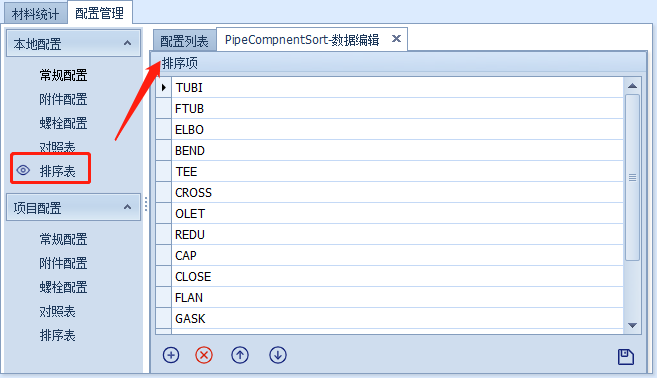
Applies to scenarios that require custom sorting rules, such as piping material statistics.
For button functions, see General Configuration.
7. Software Settings
1. Startup Mode
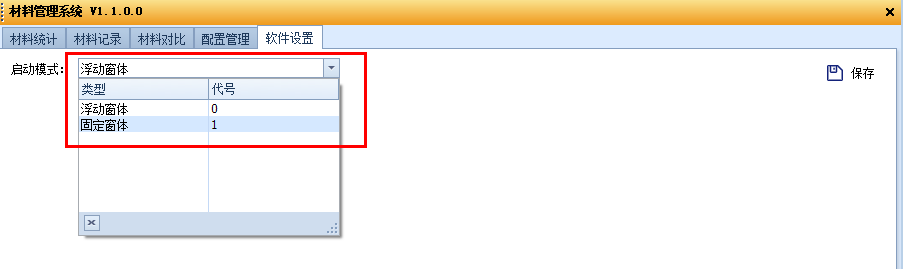
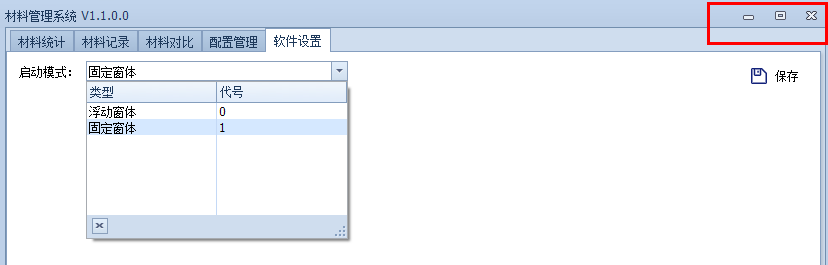
The default [Startup Mode] is Floating Window (can be docked in PDMS). You can switch it to Fixed Window (minimize and maximize), click [Save], and restart PDMS/E3D.
2. Fixed Window
Common Expressions Explained
| LT | Less than |
|---|---|
| LE | Less than or equal to |
| GT | Greater than |
| GE | Greater than or equal to |
| EQ | Equal to |
| AND | And; both expressions must be satisfied |
| OR | Or; either expression must be satisfied |
| STR(A) | Converts variable A to a string |
| BEF(A,B) | Returns the part of string A before keyword B |
| AFT(A,B) | Returns the part of string A after keyword B |
| + | Concatenates strings / adds numbers |
Appendix 1: Piping Material Summary Configuration Example
- Create an Excel template.
Create the material configuration based on the content and format of this template:
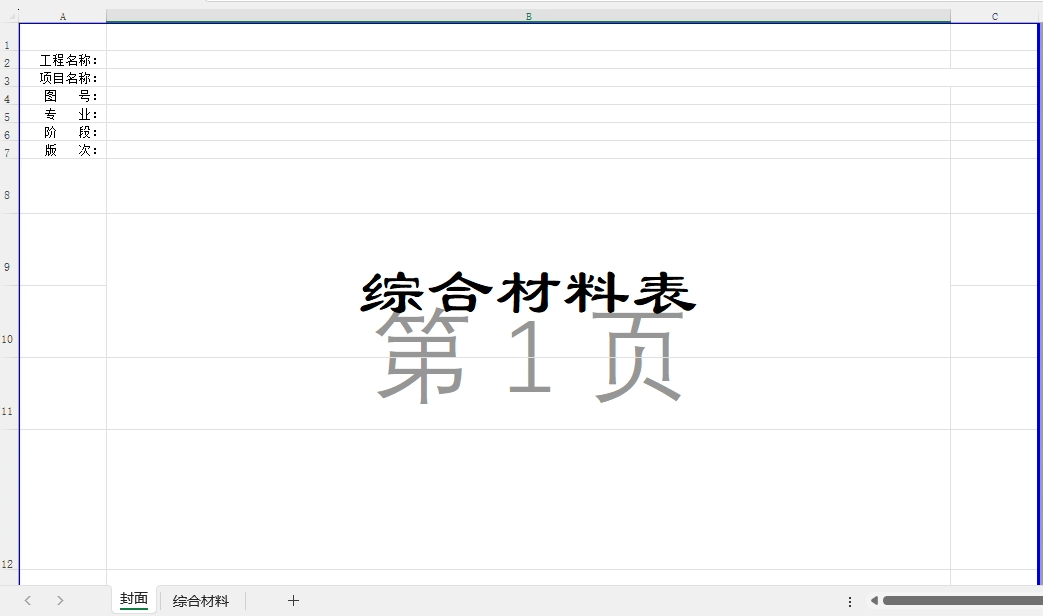
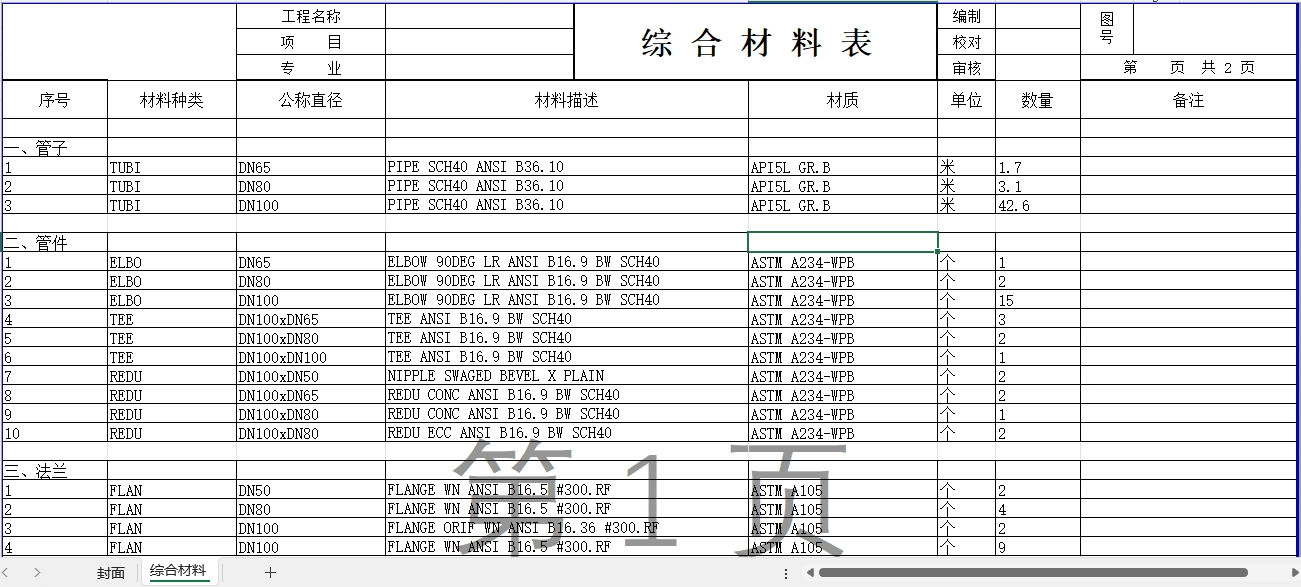
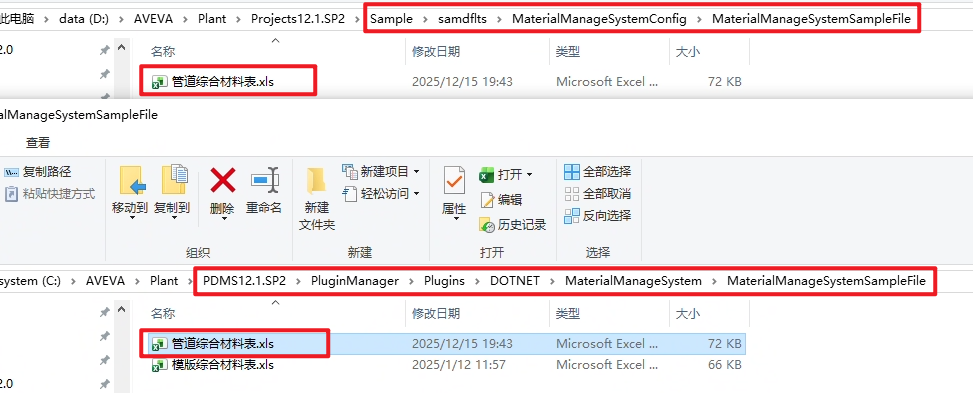
Place the prepared Excel workbook (.xls) in one of the following paths (paths may vary by user; place it according to your actual environment):
① Local path: C:\AVEVA\Plant\PDMS12.1.SP2\PluginManager\Plugins\DOTNET\MaterialManageSystem\MaterialManageSystemSampleFile (available only on this computer)
② Project path: D:\AVEVA\Plant\Projects12.1.SP2\Sample\samdflts\MaterialManageSystemConfig\MaterialManageSystemSampleFile (available to all users in the same project)
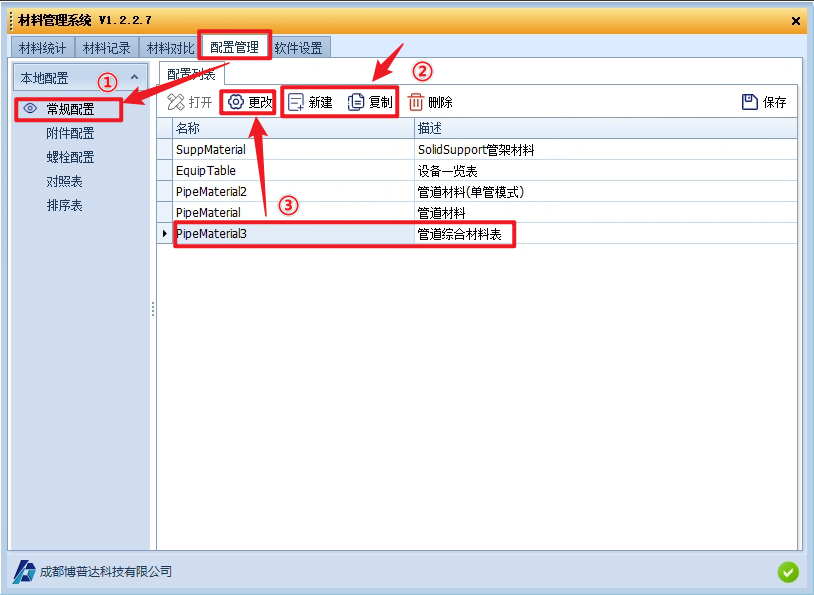
- Create a Configuration
Open Material Management System → Configuration Management → General Configuration:
Create a new piping material configuration in the list (you can also copy an existing configuration), and then click Change.
- Change the Configuration
(1) Filter Expression
This expression filters the objects to be counted. Common expressions are:
(type of owner eq ‘BRAN’ and type neq ‘TUBI’ and type neq ‘ATTA’ and type neq ‘INST’ and type neq ‘WELD’ and mtoc neq ‘DOTD’ and mtoc neq ‘OFF’) or (type neq ‘TUBI’ and type of mtbegref eq ‘BRAN’ and mtohead of mtbegref neq ‘OFF’ and mtohead of mtbegref neq ‘DOTD’) or (type eq ‘TUBI’ and mtotube of mtbegref neq ‘OFF’ and mtotube of mtbegref neq ‘DOTD’)
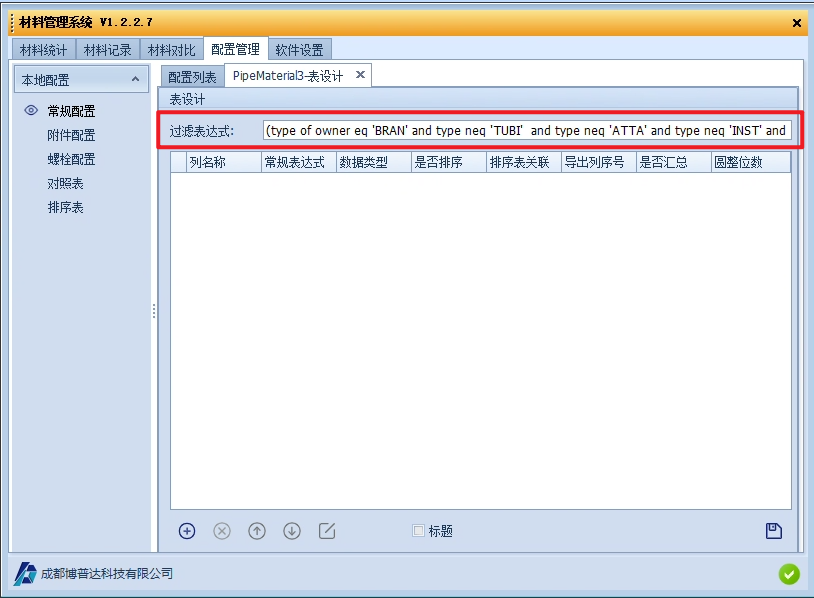
The expression has two parts:
① Filter fittings: (type of owner eq ‘BRAN’ and type neq ‘TUBI’ and type neq ‘ATTA’ and type neq ‘INST’ and type neq ‘WELD’ and mtoc neq ‘DOTD’ and mtoc neq ‘OFF’)
Meaning: count fittings under the BRAN level whose type is not TUBI, ATTA, INST, or WELD and whose material control attribute (mtoc) is not off. Users can add other filter types, for example type neq ‘PCOM’, connected with and.
② Filter straight pipe segments: (type neq ‘TUBI’ and type of mtbegref eq ‘BRAN’ and mtohead of mtbegref neq ‘OFF’ and mtohead of mtbegref neq ‘DOTD’) or (type eq ‘TUBI’ and mtotube of mtbegref neq ‘OFF’ and mtotube of mtbegref neq ‘DOTD’)
Meaning: count straight pipe segments in all cases. Modifying this part is not recommended.
Note: The two parts above are connected with or.
(2) Attribute Extraction
Edit the attribute extraction expressions according to the template:
① Material Type
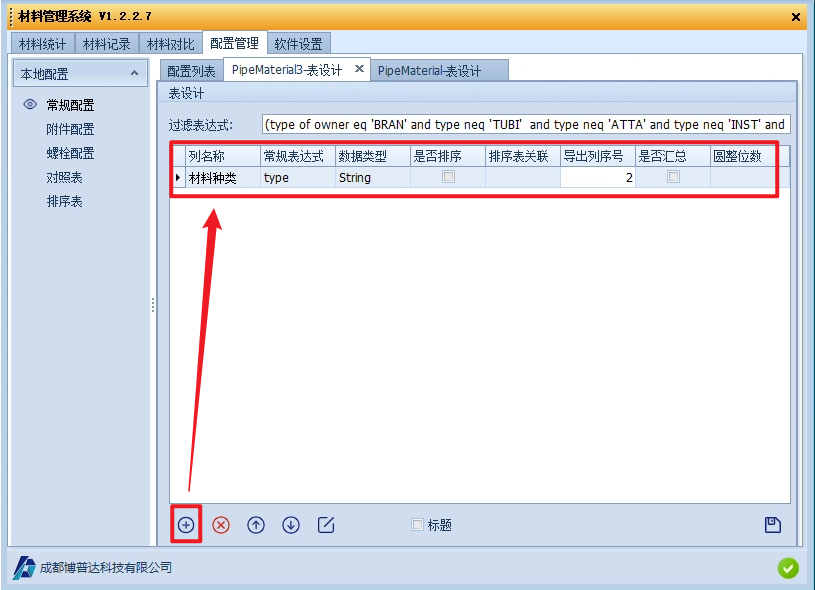
Column Name: Can be defined freely; it is not the column name in Excel.
General Expression: The material type is the model type, so enter type.
Data Type: The type is text, so select String.
Sort: When selected, the statistics results are sorted alphabetically. See below for sort table association.
Export Column No.: The extracted content is placed in a column in Excel, so the column number is 2.
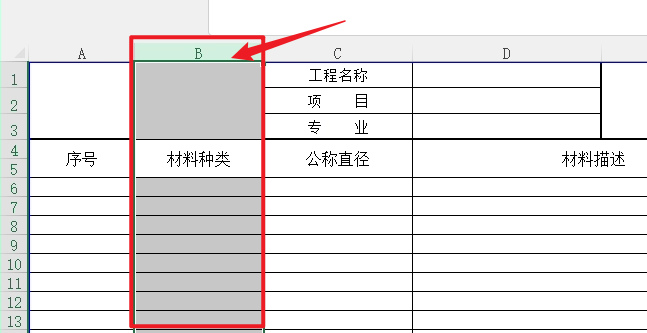
Summarize and Decimal Places: Used for quantity-related attributes; leave blank for other attributes.
② Nominal Diameter
Ordinary fittings are usually expressed as 'DN + nominal diameter', while fittings with different nominal diameters need to show different diameters.
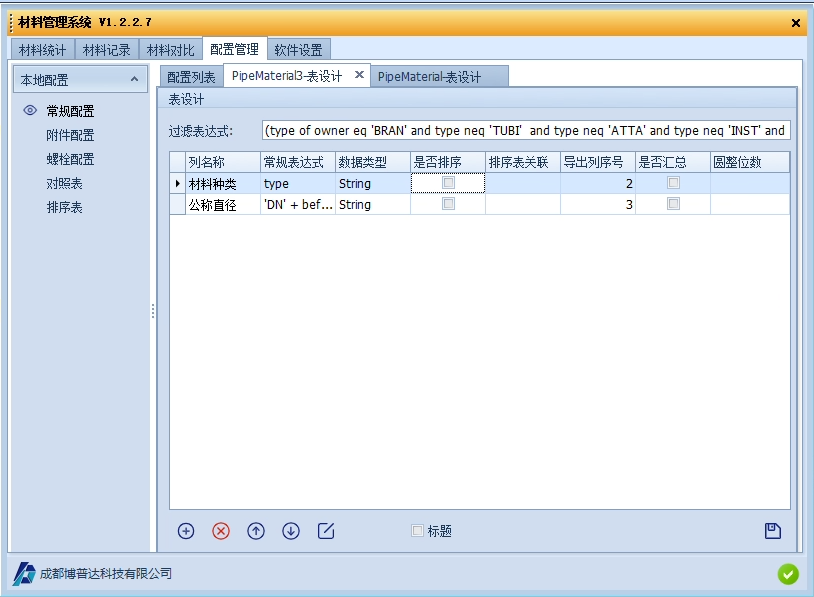
General Expression: ‘DN’ + bef(str(P1BOR),’mm’). This expression extracts the diameter at point P1 of the fitting and applies only to ordinary fittings. For reducer fittings, use a special expression.
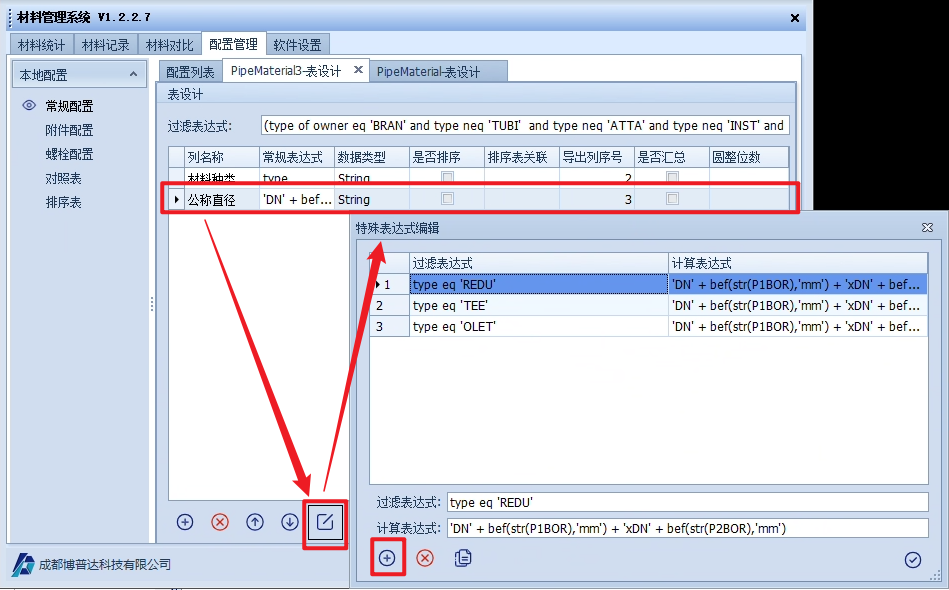
Add filter expressions and calculation expressions for reducer fittings:
Use type eq ‘REDU’ to filter the model type. The same applies to TEE and OLET.
The calculation expression for REDU is: ‘DN’ + bef(str(P1BOR),’mm’) + ‘xDN’ + bef(str(P2BOR),’mm’)
The same applies to TEE and OLET: ‘DN’ + bef(str(P1BOR),’mm’) + ‘xDN’ + bef(str(P3BOR),’mm’)
Note: During statistics, special expressions are evaluated before general expressions. Special expressions apply when a column has multiple rules.
③ Material Description
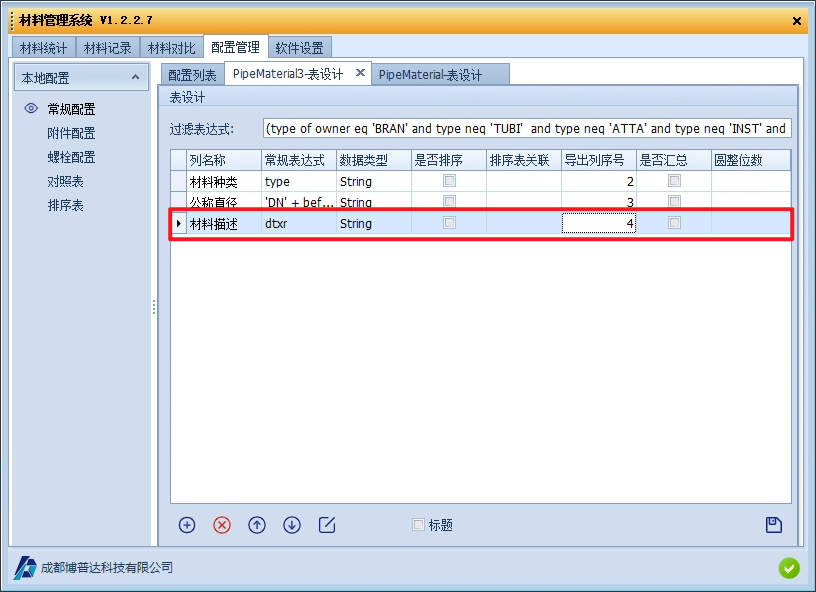
Enter dtxr in the general expression.
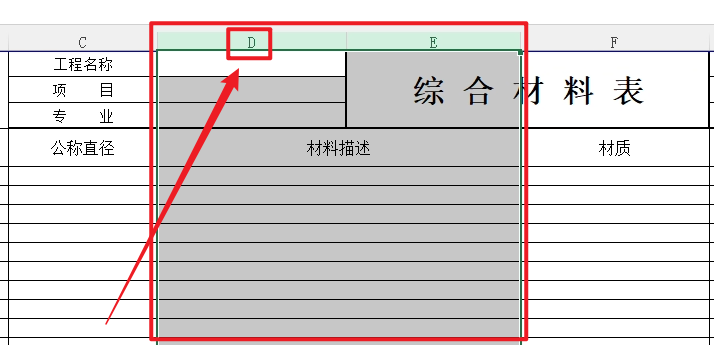
For merged cells, it is recommended to use the first merged column as the export column, so the column number here is 4.
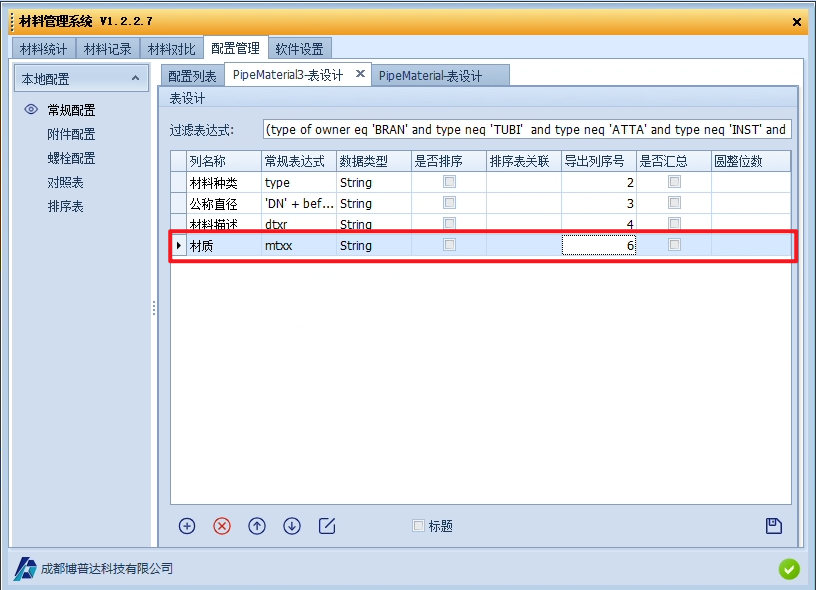
④ Material
Enter mtxx in the general expression; the export column number is 6.
⑤ Unit
General Expression: 'pcs' for fittings and 'm' for straight pipe segments (entered in the special expression).
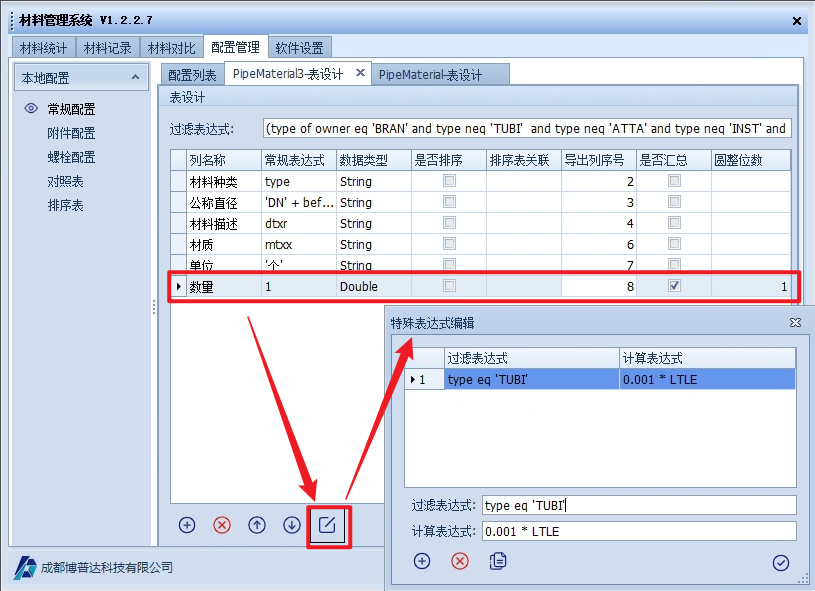
⑥ Quantity
General Expression: 1 for fittings; for straight pipe segments, the LTLE attribute of TUBI (entered in the special expression).
Data Type: Quantity is numeric, so select Double.
Summarize: Select this option for quantity statistics.
Decimal Places: Number of decimal places to keep, depending on the project.
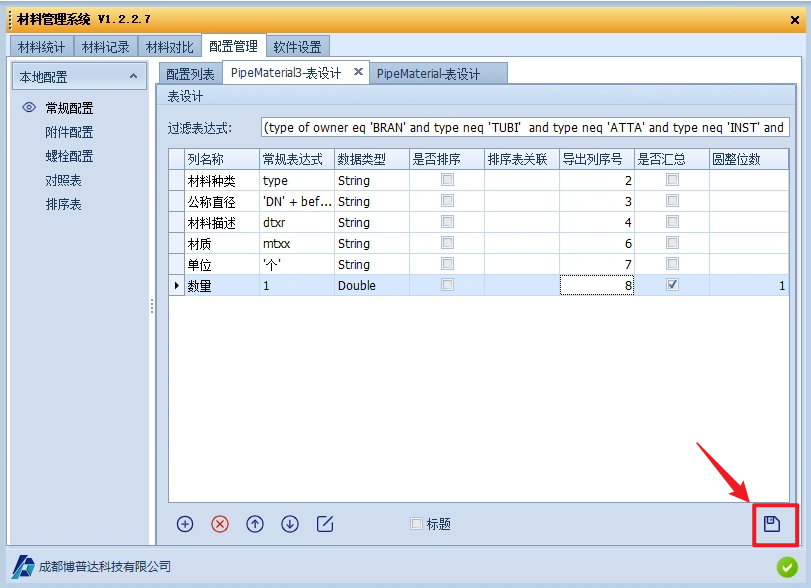
After configuring the above, save the configuration.
At this point, the main content of the Excel template can be extracted. Generate a material report to see the initial result:
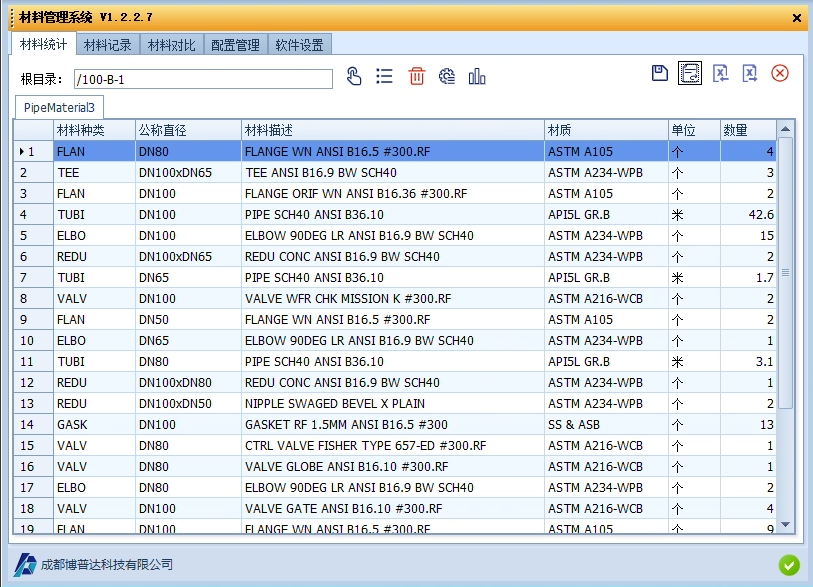
Although every column is extracted successfully, the order is rather disordered. Next, configure the sorting settings.
(3) Sorting
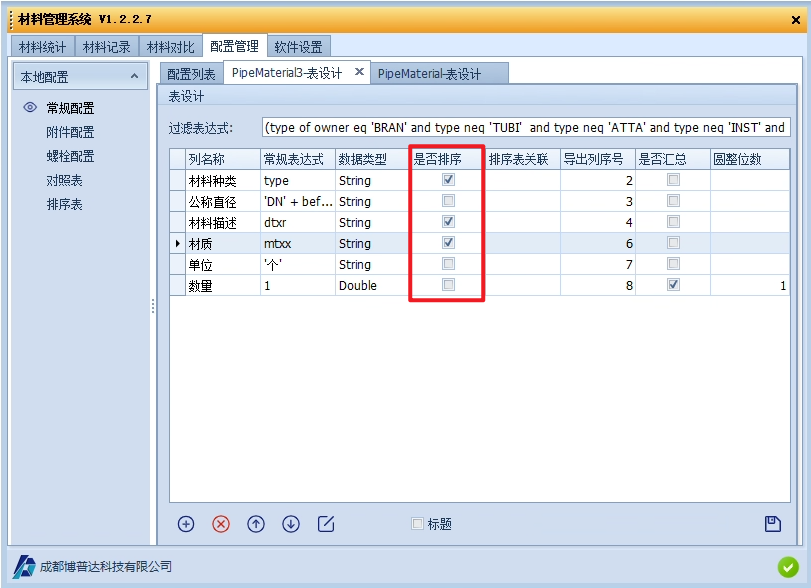
① Direct Sorting:
Select the Sort check box for the corresponding column. The column will then be sorted alphabetically when the material report is generated.
You can also use nominal diameter as one of the sorting references, but the nominal diameter configured above starts with the text 'DN' and is not suitable for sorting. Therefore, extract the nominal diameter data separately as a sorting basis.
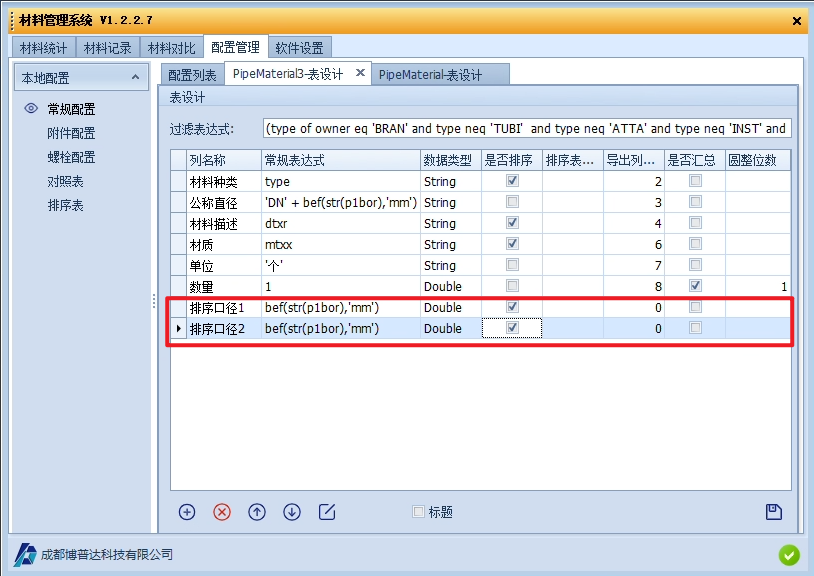
Reducer fittings must be considered here, so two sorting bases are required. For ordinary fittings, enter bef(str(P1BOR),’mm’) in the general expression. For reducer fittings, also enter a special expression in Sorting Basis 2.
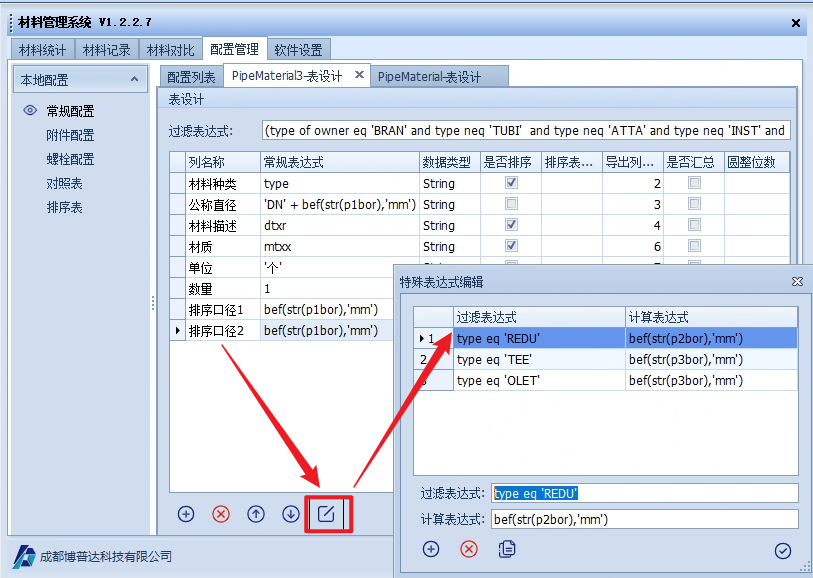
Note: The expression bef(str(P1BOR),’mm’) outputs a number, so select Double as the data type. This data is not output to the Excel file, so the export column number is 0.
After saving the configuration, generate the material report again to see the result:
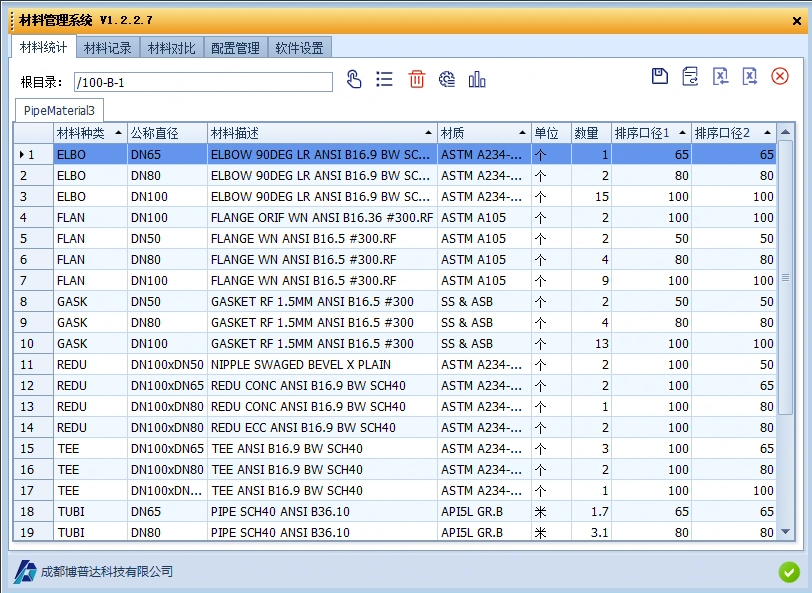
The material table is now sorted in a certain order. You can right-click and use 'Custom Sort' to further control the sorting priority.
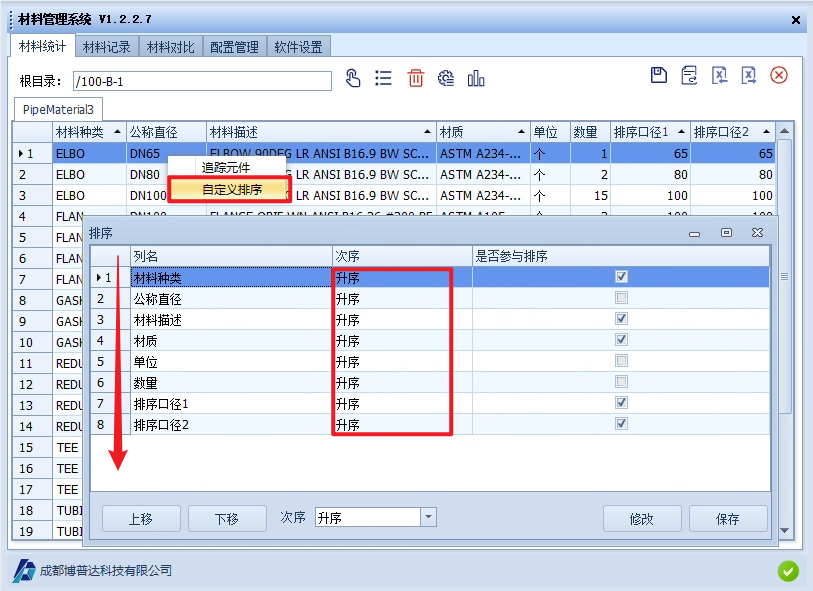
In this window, the higher a column appears, the higher its sorting priority. You can adjust the sorting priority and sort order (ascending or descending) of each column. Save the changes and generate the material report again for them to take effect.
② Sort Table Association
Take material type as an example. With direct sorting, the final result is sorted alphabetically only. By associating a sort table, users can customize the sorting order of material types.
Click Sort Table on the left, create a new sort table, and open it.
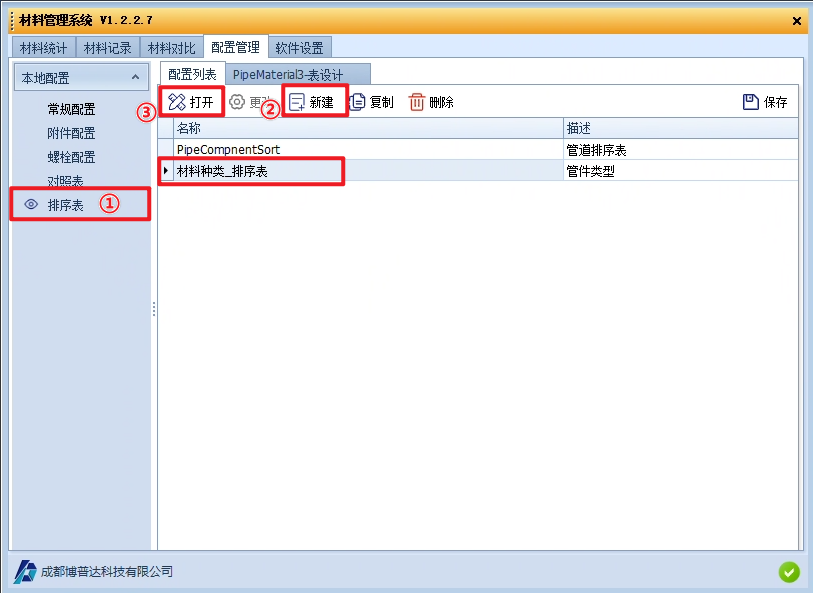
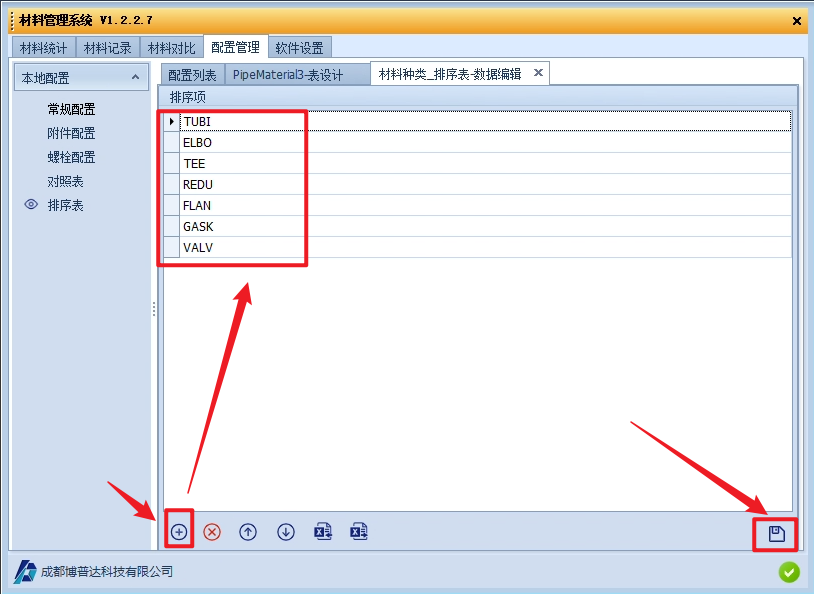
Enter the fitting types in the sort table in the desired order and save it:
Next, in the material configuration, set the sort table association for material type and save it:
Generate the material report again to see the result.
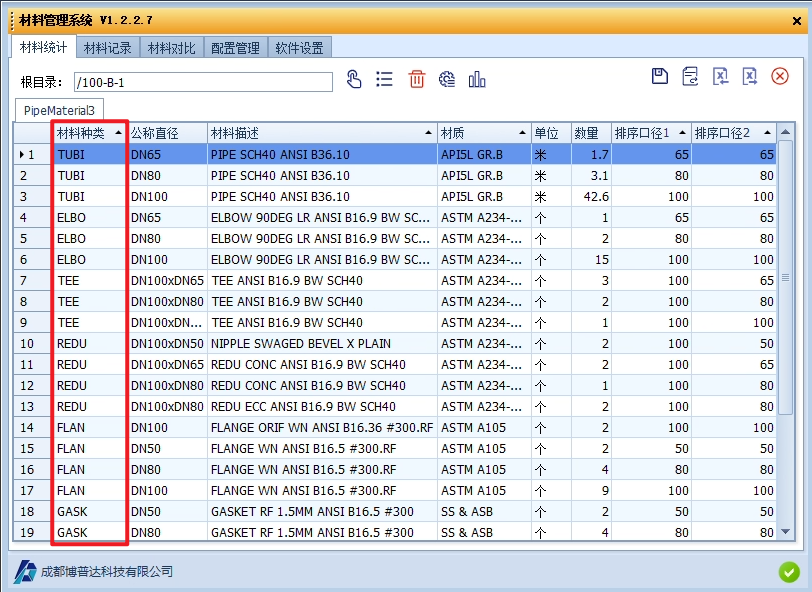
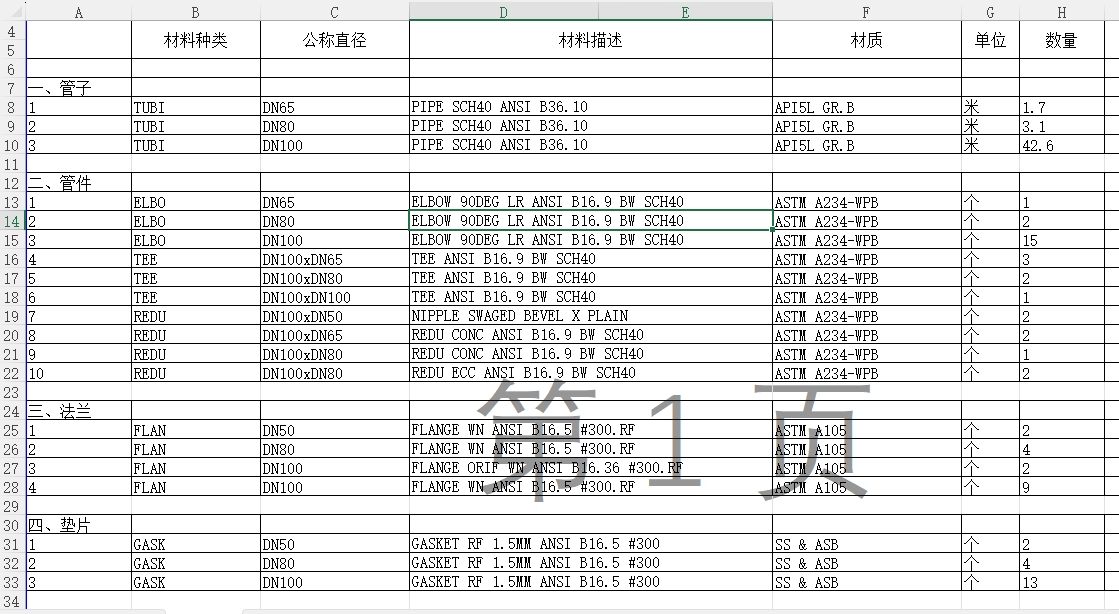
The exported Excel file now has the following format:
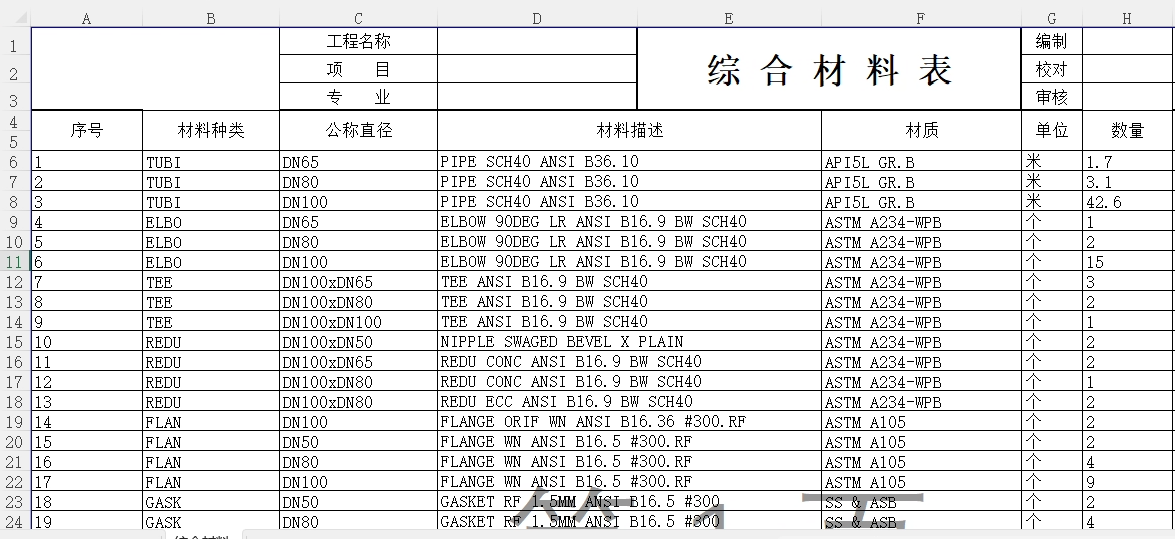
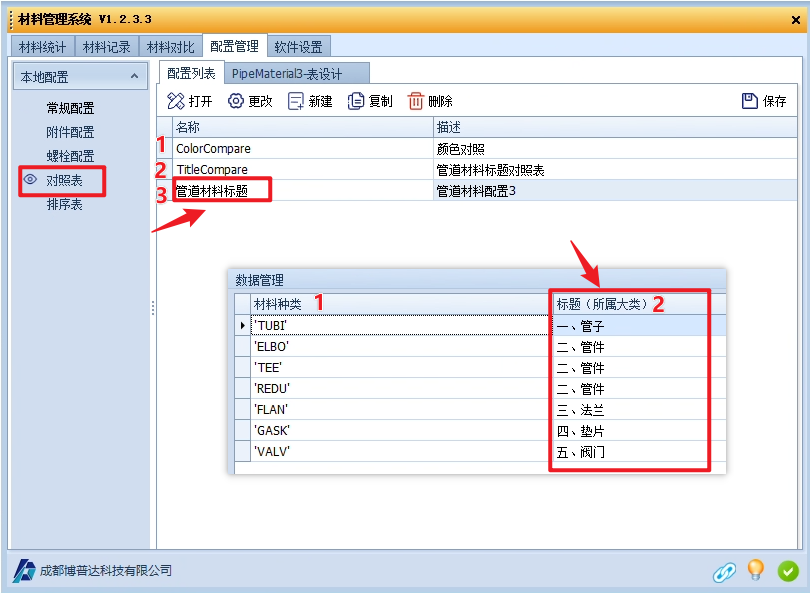
According to the template at the beginning, the format of the fitting material table still needs to be further categorized to make the summary material table tidier. This can be done by adding a 'Title'.
(4) Title
Open the Piping Material Summary configuration in General Configuration, select Title, and enter the number of blank rows. The number of blank rows is the number of blank rows starting from the report output row.
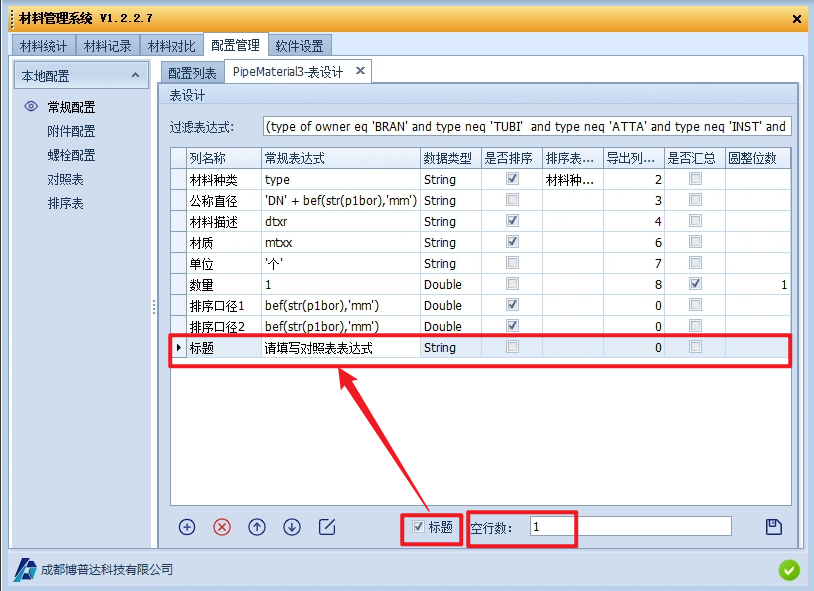
As you can see, the general expression needs a lookup table (the standard by which materials are categorized).
Next, click Lookup Table, create a new configuration, and then click Change.
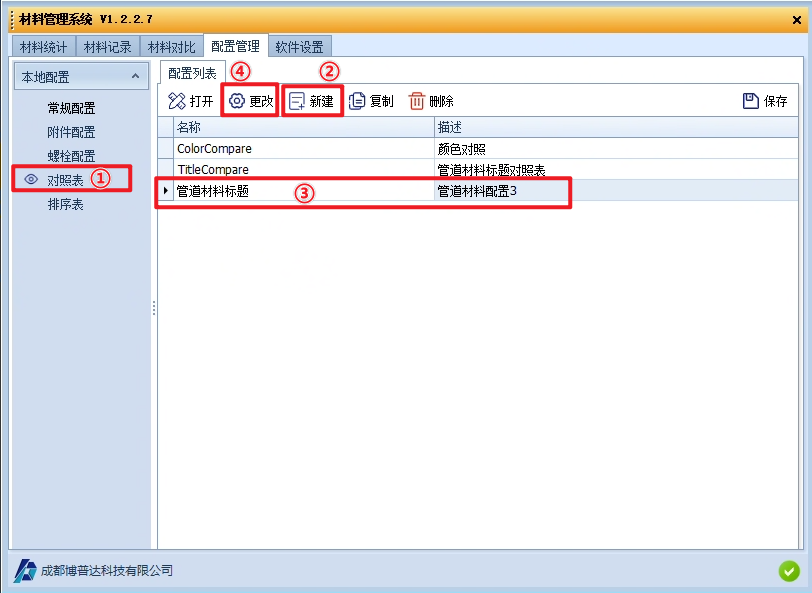
In Change, set the name of each lookup table column. For example, to further categorize fitting types, you need two columns: material type (type) and category (pipe, fitting, valve, etc.).
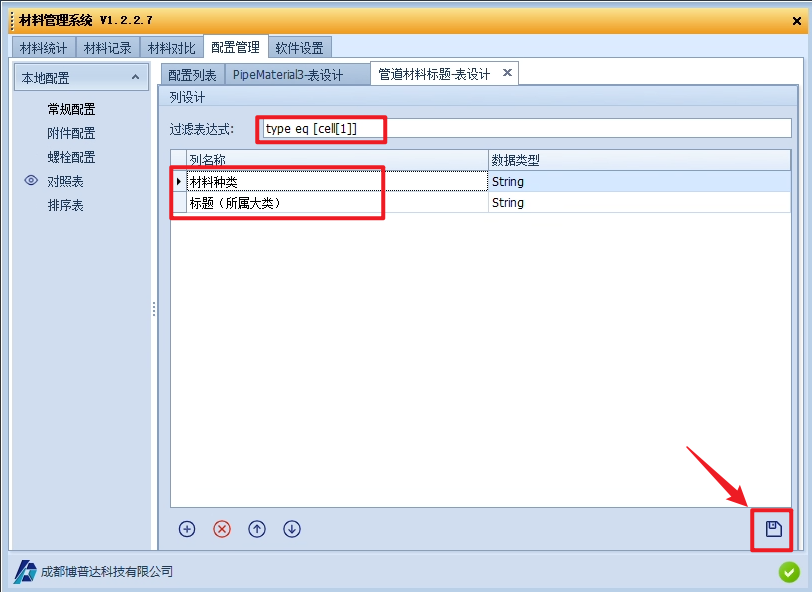
The filter expression associates the extracted type attribute with the lookup table. cell[1] refers to the first column, i.e., the material type column in the figure above. Enter the filter expression: type eq [cell[1]] ([cell[1]] is a fixed format; only the number in the brackets can be changed). All data types are text, so select String for all of them. Save and close the window.
Next, select the lookup table you created and click Open.
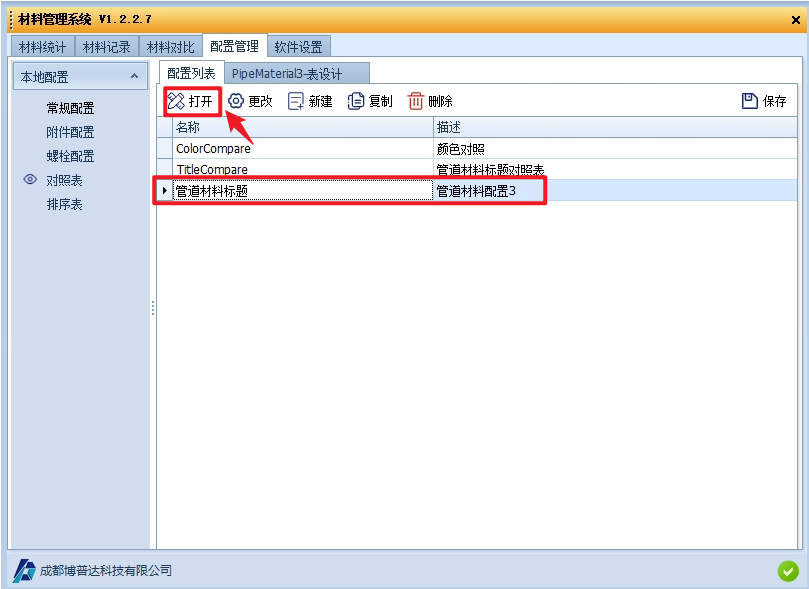
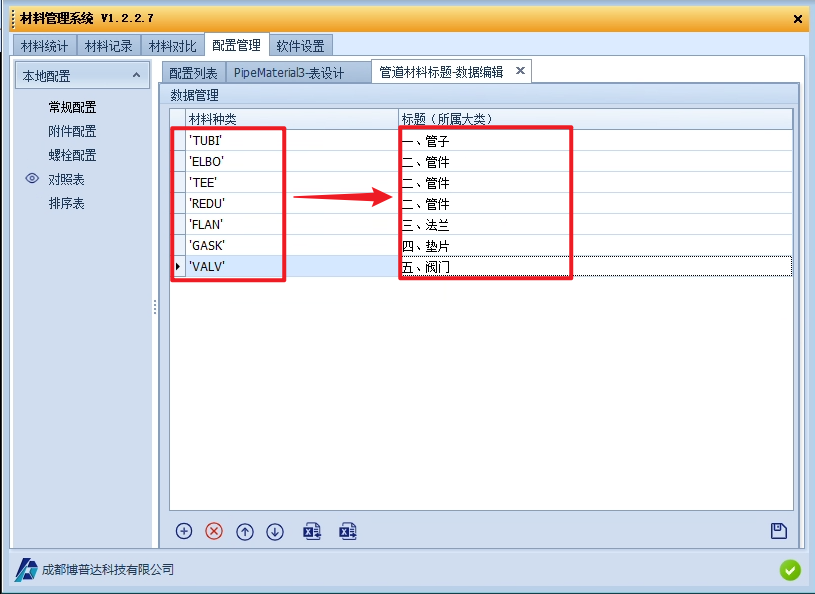
In this window, set the specific mappings and save them. (The first column is the extracted fitting type, which is text and should be written in double single quotation marks or double vertical bars; all types must be entered.)
Next, enter the lookup table expression in the Piping Material Summary configuration and save it:
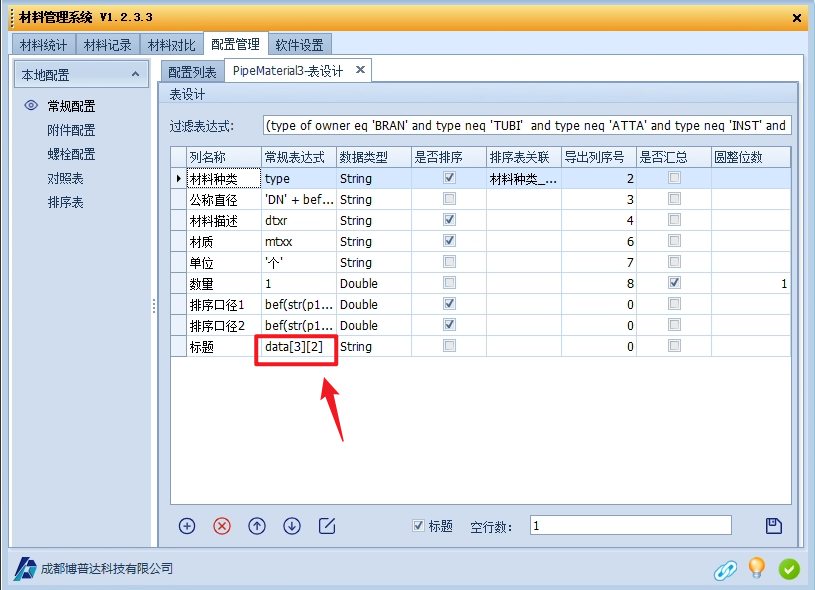
data[3][2] means extracting the data matched in column 2 of lookup table 3.
Finally, select the following options when exporting the report:
The final exported Excel file looks like this:
The related configuration files are stored in the following paths:
① Local path: C:\AVEVA\Plant\PDMS12.1.SP2\PluginManager\Plugins\DOTNET\MaterialManageSystem
The three folders outlined in the figure:
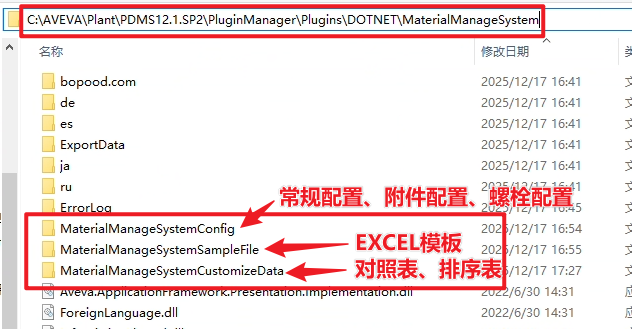
② Project path: D:\AVEVA\Plant\Projects12.1.SP2\Sample\samdflts\MaterialManageSystemConfig
The three folders outlined in the figure
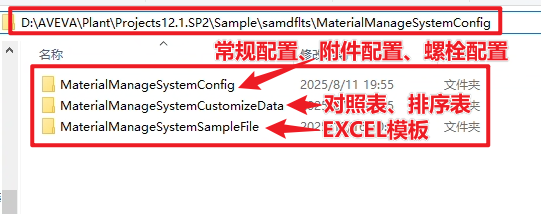
Note: These folders can be copied and sent to other users.